<?xml version="1.0" encoding="utf-8"?><feed xmlns="http://www.w3.org/2005/Atom" ><generator uri="https://jekyllrb.com/" version="3.10.0">Jekyll</generator><link href="https://www.jomppanen.com/feed.xml" rel="self" type="application/atom+xml" /><link href="https://www.jomppanen.com/" rel="alternate" type="text/html" /><updated>2026-07-07T16:24:22+00:00</updated><id>https://www.jomppanen.com/feed.xml</id><title type="html">Tuomas Jomppanen</title><subtitle>Write an awesome description for your new site here. You can edit this line in _config.yml. It will appear in your document head meta (for Google search results) and in your feed.xml site description.</subtitle><entry><title type="html">Using Dispatch to communicate between Stimulus Controllers</title><link href="https://www.jomppanen.com/2025/07/23/use-dispatch-to-communicate-between-stimulus-controllers.html" rel="alternate" type="text/html" title="Using Dispatch to communicate between Stimulus Controllers" /><published>2025-07-23T00:00:00+00:00</published><updated>2025-07-23T00:00:00+00:00</updated><id>https://www.jomppanen.com/2025/07/23/use-dispatch-to-communicate-between-stimulus-controllers</id><content type="html" xml:base="https://www.jomppanen.com/2025/07/23/use-dispatch-to-communicate-between-stimulus-controllers.html"><![CDATA[<p>I like to use <code class="language-plaintext highlighter-rouge">dispatch</code> to drive/trigger UI interactions that require multiple <a href="https://stimulus.hotwired.dev/reference/controllers">Stimulus Controllers</a>. The <code class="language-plaintext highlighter-rouge">dispatch</code> in <a href="https://stimulus.hotwired.dev">Stimulus</a> encapsulates JavaScript’s own event dispatching functionality, making it simpler to use. I’ll show you how I’m using it in <a href="https://www.masterlist.fi">Masterlist</a>, a task management app which I’ve built.</p>


<p>Here is a very simple example of <code class="language-plaintext highlighter-rouge">dispatch</code> in action. When user clicks the checkbox in Masterlist, it emits an event. The other checkbox under the overlay is listening for that event, and changes it’s status accordingly.</p>

<p><img src="/images/masterlist-checkbox-interaction.webp" alt="" /></p>

<h4 id="example">Example</h4>

<p>Here are two containers, <code class="language-plaintext highlighter-rouge">&lt;main&gt;</code> and <code class="language-plaintext highlighter-rouge">&lt;aside&gt;</code>. They both checkboxes with Stimulus controllers attached to them. When you click the checkbox in <code class="language-plaintext highlighter-rouge">&lt;aside&gt;</code>, the change should reflect to a checkbox in<code class="language-plaintext highlighter-rouge">&lt;main&gt;</code>.</p>

<div class="language-html highlighter-rouge"><div class="highlight"><pre class="highlight"><code><span class="nt">&lt;main&gt;</span>
  <span class="nt">&lt;label&gt;</span>
    <span class="nt">&lt;input</span> <span class="na">type=</span><span class="s">"checkbox"</span> 
          <span class="na">data-controller=</span><span class="s">"checkable"</span> 
          <span class="na">data-checkable-id-value=</span><span class="s">"1"</span>
          <span class="na">data-action=</span><span class="s">"checkable:statusChanged@window-&gt;checkable#setStatus"</span><span class="nt">&gt;</span>
    Cats
  <span class="nt">&lt;/label&gt;</span>
  <span class="nt">&lt;label&gt;</span>
    <span class="nt">&lt;input</span> <span class="na">type=</span><span class="s">"checkbox"</span> 
          <span class="na">data-controller=</span><span class="s">"checkable"</span> 
          <span class="na">data-checkable-id-value=</span><span class="s">"2"</span>
          <span class="na">data-action=</span><span class="s">"checkable:statusChanged@window-&gt;checkable#setStatus"</span><span class="nt">&gt;</span>
    Dogs
  <span class="nt">&lt;/label&gt;</span>
<span class="nt">&lt;/main&gt;</span>
<span class="nt">&lt;aside&gt;</span>
  <span class="nt">&lt;label&gt;</span>
    <span class="nt">&lt;input</span> <span class="na">type=</span><span class="s">"checkbox"</span> 
           <span class="na">data-controller=</span><span class="s">"checkable"</span> 
           <span class="na">data-checkable-id-value=</span><span class="s">"1"</span> <span class="na">data-action=</span><span class="s">"click-&gt;checkable#toggle"</span><span class="nt">&gt;</span>
    Cats
  <span class="nt">&lt;/label&gt;</span>
  <span class="nt">&lt;label&gt;</span>
    <span class="nt">&lt;input</span> <span class="na">type=</span><span class="s">"checkbox"</span> 
           <span class="na">data-controller=</span><span class="s">"checkable"</span> 
           <span class="na">data-checkable-id-value=</span><span class="s">"2"</span> <span class="na">data-action=</span><span class="s">"click-&gt;checkable#toggle"</span><span class="nt">&gt;</span>
    Dogs
  <span class="nt">&lt;/label&gt;</span>
<span class="nt">&lt;/aside&gt;</span>
</code></pre></div></div>

<p>The checkboxes in <code class="language-plaintext highlighter-rouge">&lt;main&gt;</code> will lister for custom <code class="language-plaintext highlighter-rouge">checkable:statusChanged</code> events. The checkboxes in <code class="language-plaintext highlighter-rouge">&lt;aside&gt;</code> lister for JavaScript DOM <code class="language-plaintext highlighter-rouge">click</code> events. Those events enable the communication between the different checkboxes.</p>

<p>The checkboxes also have <code class="language-plaintext highlighter-rouge">[data-checkable-id-value]</code> that is used to define a value for Stimulus controller. It’s used to distinct the checkboxes from each other, the <code class="language-plaintext highlighter-rouge">id</code> is shared between a checkbox in <code class="language-plaintext highlighter-rouge">&lt;main&gt;</code> and <code class="language-plaintext highlighter-rouge">&lt;aside&gt;</code>.</p>

<h4 id="stimulus-controller">Stimulus Controller</h4>

<p>This is the controller that handles the communication between two checkboxes. The <code class="language-plaintext highlighter-rouge">id</code> is the identifier between the checkbox in <code class="language-plaintext highlighter-rouge">&lt;main&gt;</code> and <code class="language-plaintext highlighter-rouge">&lt;aside&gt;</code>. It’s the secret sauce to syncronize the <code class="language-plaintext highlighter-rouge">checked</code>-attribute between the two checkboxes.</p>

<p>The <code class="language-plaintext highlighter-rouge">checkable:statusChanged@window-&gt;checkable#setStatus</code> in HTML is the part where the listening controller action is defined. In order to listen events emitted outside the controller’s scope, you need to add <code class="language-plaintext highlighter-rouge">@window</code> after the event name.</p>

<div class="language-javascript highlighter-rouge"><div class="highlight"><pre class="highlight"><code><span class="c1">// checkable_controller.js</span>

<span class="k">import</span> <span class="p">{</span> <span class="nx">Controller</span> <span class="p">}</span> <span class="k">from</span> <span class="dl">"</span><span class="s2">@hotwired/stimulus</span><span class="dl">"</span>

<span class="k">export</span> <span class="k">default</span> <span class="kd">class</span> <span class="kd">extends</span> <span class="nx">Controller</span> <span class="p">{</span>
  <span class="kd">static</span> <span class="nx">values</span> <span class="o">=</span> <span class="p">{</span>
    <span class="na">id</span><span class="p">:</span> <span class="nb">Number</span> <span class="c1">// shared identifier of checkboxes in &lt;main&gt; and &lt;aside&gt;</span>
  <span class="p">}</span>

  <span class="nx">setStatus</span><span class="p">(</span><span class="nx">ev</span><span class="p">)</span> <span class="p">{</span>
    <span class="kd">const</span> <span class="nx">id</span> <span class="o">=</span> <span class="nx">ev</span><span class="p">.</span><span class="nx">detail</span><span class="p">.</span><span class="nx">id</span><span class="p">;</span>
    <span class="kd">const</span> <span class="nx">checked</span> <span class="o">=</span> <span class="nx">ev</span><span class="p">.</span><span class="nx">detail</span><span class="p">.</span><span class="nx">checked</span><span class="p">;</span>
    <span class="k">if</span><span class="p">(</span><span class="nx">id</span> <span class="o">==</span> <span class="k">this</span><span class="p">.</span><span class="nx">idValue</span><span class="p">)</span> <span class="p">{</span>
      <span class="c1">// without the id == this.idValue check, this code</span>
      <span class="c1">// would run on every checkbox inside &lt;main&gt;</span>
      <span class="k">this</span><span class="p">.</span><span class="nx">element</span><span class="p">.</span><span class="nx">checked</span> <span class="o">=</span> <span class="nx">checked</span><span class="p">;</span>
    <span class="p">}</span>
  <span class="p">}</span>

  <span class="nx">toggle</span><span class="p">(</span><span class="nx">ev</span><span class="p">)</span> <span class="p">{</span>
    <span class="c1">// this.idValue is the shared identifier of</span>
    <span class="c1">// checkboxes in &lt;main&gt; and &lt;aside&gt;</span>
    <span class="kd">const</span> <span class="nx">detail</span> <span class="o">=</span> <span class="p">{</span>
      <span class="na">id</span><span class="p">:</span> <span class="k">this</span><span class="p">.</span><span class="nx">idValue</span><span class="p">,</span>
      <span class="na">checked</span><span class="p">:</span> <span class="nx">ev</span><span class="p">.</span><span class="nx">target</span><span class="p">.</span><span class="nx">checked</span>
    <span class="p">}</span>
    <span class="c1">// better to use descriptive events, so</span>
    <span class="c1">// let's go with 'statusChanged'</span>
    <span class="k">this</span><span class="p">.</span><span class="nx">dispatch</span><span class="p">(</span><span class="dl">'</span><span class="s1">statusChanged</span><span class="dl">'</span><span class="p">,</span> <span class="p">{</span> <span class="na">detail</span><span class="p">:</span> <span class="nx">detail</span> <span class="p">})</span>
  <span class="p">}</span>
<span class="p">}</span>
</code></pre></div></div>

<p>That’s about it. <a href="https://codepen.io/tuomasjomppanen/pen/azvZdep">The example above</a> is also in Codepen.</p>

<p>Stimulus controllers are so simple that the blog post is short as well! 🙂</p>]]></content><author><name></name></author><summary type="html"><![CDATA[The dispatch-method is a way multiple Stimulus controllers can communicate with each, and trigger user interface interactions]]></summary></entry><entry><title type="html">Manually deploy Ruby on Rails 8 application to Linux server</title><link href="https://www.jomppanen.com/2024/11/20/manually-deploy-ruby-on-rails-8-application-to-linux-server.html" rel="alternate" type="text/html" title="Manually deploy Ruby on Rails 8 application to Linux server" /><published>2024-11-20T00:00:00+00:00</published><updated>2024-11-20T00:00:00+00:00</updated><id>https://www.jomppanen.com/2024/11/20/manually-deploy-ruby-on-rails-8-application-to-linux-server</id><content type="html" xml:base="https://www.jomppanen.com/2024/11/20/manually-deploy-ruby-on-rails-8-application-to-linux-server.html"><![CDATA[<p>This blog post describes how to manually set up and deploy your Ruby on Rails 8 application on a Linux Server with as few dependencies as possible. It’s all manual, there is no automations or containers. No Cloud orchestration. It’s just you and your Linux server.</p>

<p>To make things way easier, I’m assuming your Ruby on Rails application uses SQLite3 for database.</p>

<p>It’s fair to mention that there are easier options for deploying Ruby on Rails applications:</p>

<ul>
  <li><a href="https://kamal-deploy.org/">Kamal</a> is the “offical” tool for deploying Ruby on Rails 8 applications (requires Docker)</li>
  <li><a href="https://capistranorb.com/">Capistrano</a> is a battle-tested deployment tool and it’s been around since the early days of Ruby on Rails</li>
</ul>

<p>I’ve tried both options, but I wanted even simpler way to deploy my applications. That’s where this blog post came from.</p>

<div style="border: 1px solid #136d4f; background-color: #b9f4a9; padding: 0.5rem 1rem; margin-bottom: 1.5rem; border-radius: 0.45rem;">
  This blog post was used to successfully deploy Ruby on Rails application on a server running Ubuntu Linux in front of a live audience in Nov 28, 2024. The server specs were 1x CPU, 1GB memory, 10GB storage, $3/mo from <a href="https://upcloud.com/signup/?promo=MYZCV5">Upcloud</a>.
  <br />
  <small>Disclaimer: The link contains a referal code.</small>
</div>

<h2 id="before-continuing-here-are-few-things-you-need-to-understand">Before continuing, here are few things you need to understand</h2>

<ul>
  <li>This article assumes you are using Ubuntu Linux, these instructions might not work if you’re using any other Linux distribution</li>
  <li>In this article, <code class="language-plaintext highlighter-rouge">example.com</code> will be used as a placeholder for your own domain or IP-address, adjust accordingly</li>
  <li>You have to configure the firewall (I’m using <a href="https://help.ubuntu.com/community/UFW">UFW</a>)</li>
  <li>You have to secure the SSH server (disable root login, disable password login)</li>
  <li>You know how to set up SSH public-key authentication for your server</li>
  <li>Configure DNS-records so that your domain’s A-record resolves into server’s IP-address</li>
  <li>Please consider this article as <strong>“some guy wrote in Internet”</strong>-level information, use your own judgement and common sense</li>
  <li>You can host multiple Ruby on Rails applications in same server by using this method, but you have to understand that apps are deployed using same unix user <code class="language-plaintext highlighter-rouge">deploy</code> and therefore are able to write each other directories</li>
  <li>Finally the disclaimer: If you follow the instructions of this article, you will do it at your own risk – I will take no responsibility at all</li>
</ul>

<p>Now that I’m safe for any legal proceedings, let’s start 😅</p>

<h2 id="the-deployment-consists-of-following-building-blocks">The deployment consists of following building blocks</h2>

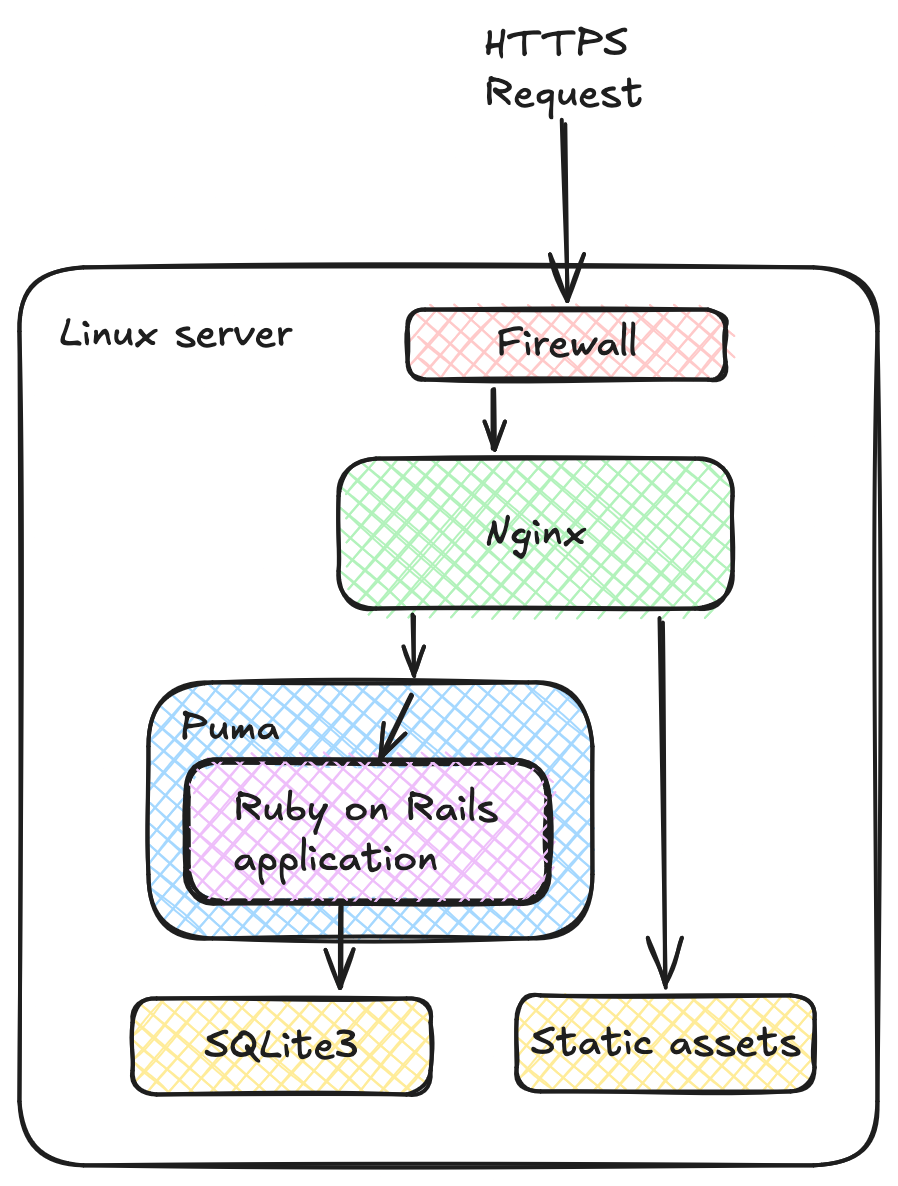
<p>Here is a high level overview how the server will be set up.</p>

<div style="width: 100%; text-align: center;">
  <img style="width: 50%;" src="/images/simple-deployment-architecture.png" />
</div>

<ul>
  <li><strong>Firewall</strong> - Allows at least HTTPS and HTTP requests, remember configuring firewall is out of scope of this article</li>
  <li><strong>Nginx</strong> - Webserver which handles the requests from the browser, and routes the requests into Puma application server or directly serves static assets from assets directory</li>
  <li><strong>Puma</strong> - Application server which runs your Ruby on Rails application</li>
  <li><strong>SQLite3</strong> - Database server which is embedded into your Ruby on Rails application</li>
  <li><strong>Static assets</strong> - Your Ruby on Rails application has <code class="language-plaintext highlighter-rouge">public/</code> directory, Nginx will serve these assets directly without using Puma and saving some precious server resources</li>
  <li><strong>Let’s Encrypt</strong> - Generate SSL certificates so you can use HTTPS</li>
</ul>

<p>The Let’s Encrypt is missing on the diagram, but it has a background process running that keeps the SSL certificates up-to-date.</p>

<h2 id="creating-the-deploy-user">Creating the deploy user</h2>

<p>In this step, you have to connect to your server as <code class="language-plaintext highlighter-rouge">root</code> user and create the <code class="language-plaintext highlighter-rouge">deploy</code> user.</p>

<p>With <code class="language-plaintext highlighter-rouge">--disabled-password</code> option, <code class="language-plaintext highlighter-rouge">deploy</code>-user cannot authenticate using password. The only way to do authentication will be public-key authentication</p>

<div class="language-bash highlighter-rouge"><div class="highlight"><pre class="highlight"><code><span class="nv">$ </span>adduser <span class="nt">--disabled-password</span> deploy
<span class="nv">$ </span>usermod <span class="nt">-aG</span> <span class="nb">sudo </span>deploy
</code></pre></div></div>

<p>Create a directory for your SSH files and your public key file.</p>

<div class="language-bash highlighter-rouge"><div class="highlight"><pre class="highlight"><code><span class="nv">$ </span><span class="nb">mkdir</span> <span class="nt">-p</span> /home/deploy/.ssh
<span class="nv">$ </span><span class="nb">chown</span> <span class="nt">-R</span> deploy:deploy /home/deploy/.ssh
<span class="nv">$ </span><span class="nb">chmod </span>700 /home/deploy/.ssh
</code></pre></div></div>

<p>Append the contents of your SSH public key into <code class="language-plaintext highlighter-rouge">/home/deploy/.ssh/authorized_keys</code>, most likely the file will be empty or you have to create it.</p>

<p>Change the ownership to <code class="language-plaintext highlighter-rouge">deploy</code> and limit the file privileges so that SSH process can only read the file. SSH’s public key authentication will not work unless the file privileges are</p>

<div class="language-bash highlighter-rouge"><div class="highlight"><pre class="highlight"><code><span class="nv">$ </span><span class="nb">chown </span>deploy:deploy /home/deploy/.ssh/authorized_keys
<span class="nv">$ </span><span class="nb">chmod </span>700 /home/deploy/.ssh/authorized_keys
</code></pre></div></div>

<p>If you want to make sure, you can check the file privileges with <code class="language-plaintext highlighter-rouge">ls -la</code>.</p>

<div class="language-bash highlighter-rouge"><div class="highlight"><pre class="highlight"><code><span class="nv">$ </span><span class="nb">ls</span> <span class="nt">-la</span> /home/deploy/.ssh/authorized_keys
<span class="nt">-rwx------</span> 1 deploy deploy 748 Nov 27 07:48 /home/deploy/.ssh/authorized_keys
</code></pre></div></div>

<p>Give <code class="language-plaintext highlighter-rouge">deploy</code>-user root-privileges by editing the <code class="language-plaintext highlighter-rouge">sudoers</code>-file. Since <code class="language-plaintext highlighter-rouge">deploy</code>-user does not have a password, it needs to be disabled on sudoers file as well, otherwise it will ask password when running commands via sudo.</p>

<div class="language-bash highlighter-rouge"><div class="highlight"><pre class="highlight"><code><span class="nv">$ </span>visudo
</code></pre></div></div>

<p>Add this line at the end of file:</p>

<div class="language-plaintext highlighter-rouge"><div class="highlight"><pre class="highlight"><code>deploy ALL=(ALL) NOPASSWD:ALL
</code></pre></div></div>

<p>That is the only part where you need <code class="language-plaintext highlighter-rouge">root</code>-user, from now on you will be using <code class="language-plaintext highlighter-rouge">deploy</code>-user when logging in to your production server via SSH.</p>

<p>If you want to know more, head to SSH’s website for details about <a href="https://www.ssh.com/academy/ssh/public-key-authentication">public-key authentication</a>.</p>

<h2 id="setting-up-the-server">Setting up the server</h2>

<p>First, let’s try the public key authentication. Use SSH to connect your server as <code class="language-plaintext highlighter-rouge">deploy</code>-user:</p>

<div class="language-bash highlighter-rouge"><div class="highlight"><pre class="highlight"><code><span class="nv">$ </span>ssh deploy@example.com
</code></pre></div></div>

<p>If you see Ubuntu Linux welcome message, you are good to go! The IP-addresses are different for each server.</p>

<div class="language-bash highlighter-rouge"><div class="highlight"><pre class="highlight"><code><span class="nv">$ </span>ssh deploy@masterlist.fi
Welcome to Ubuntu 24.04 LTS <span class="o">(</span>GNU/Linux 6.8.0-31-generic x86_64<span class="o">)</span>

 <span class="k">*</span> Documentation:  https://help.ubuntu.com
 <span class="k">*</span> Management:     https://landscape.canonical.com
 <span class="k">*</span> Support:        https://ubuntu.com/pro

 System information as of Wed Nov 27 07:57:18 AM UTC 2024

  System load:           0.0
  Usage of /:            28.3% of 9.76GB
  Memory usage:          33%
  Swap usage:            0%
  Processes:             99
  Users logged <span class="k">in</span>:       1
  IPv4 address <span class="k">for </span>eth0: 192.168.2.1
  IPv6 address <span class="k">for </span>eth2: 0000:0000:0000:0000:0000:ffff:c0a8:0201
...
&lt;&lt;<span class="nt">--</span> clip <span class="nt">--</span><span class="o">&gt;&gt;</span>
...

Last login: Thu Nov 21 15:25:13 2024 from 12.34.56.78
<span class="err">$</span>
</code></pre></div></div>

<p>Let’s install few packages that you are going to need. We’re going to use <code class="language-plaintext highlighter-rouge">sudo</code> command which runs the commands as <code class="language-plaintext highlighter-rouge">root</code>-user.</p>

<div class="language-bash highlighter-rouge"><div class="highlight"><pre class="highlight"><code><span class="nv">$ </span><span class="nb">sudo </span>apt update
<span class="nv">$ </span><span class="nb">sudo </span>apt <span class="nb">install</span> <span class="nt">-y</span> curl git-core nginx nodejs npm yarn ruby-full build-essential sqlite3 libsqlite3-dev libffi-dev libyaml-dev zlib1g-dev pkg-config
</code></pre></div></div>

<p>This will install Git, Nginx, NodeJS, Yarn, Npm, development libraries and SQLite3.</p>

<p>Install Yarn since Ruby on Rails uses it.</p>

<div class="language-bash highlighter-rouge"><div class="highlight"><pre class="highlight"><code><span class="nv">$ </span><span class="nb">sudo </span>npm <span class="nb">install</span> <span class="nt">--global</span> yarn
</code></pre></div></div>

<h2 id="hosting-website-via-nginx">Hosting website via Nginx</h2>

<p>To find out if Nginx is already running on your server, use combination of commands <code class="language-plaintext highlighter-rouge">ps</code> and <code class="language-plaintext highlighter-rouge">grep</code> like this <code class="language-plaintext highlighter-rouge">ps aux | grep nginx</code>. If it is running, the output looks like this:</p>

<div class="language-bash highlighter-rouge"><div class="highlight"><pre class="highlight"><code><span class="nv">$ </span>ps aux | <span class="nb">grep </span>nginx
root       59329  0.0  0.0  65920  2436 ?        Ss   Nov17   0:00 nginx: master process /usr/sbin/nginx <span class="nt">-g</span> daemon on<span class="p">;</span> master_process on<span class="p">;</span>
www-data   59330  0.0  0.2  67016 11432 ?        S    Nov17   0:15 nginx: worker process
www-data   59331  0.0  0.2  66908 11056 ?        S    Nov17   0:00 nginx: worker process
</code></pre></div></div>

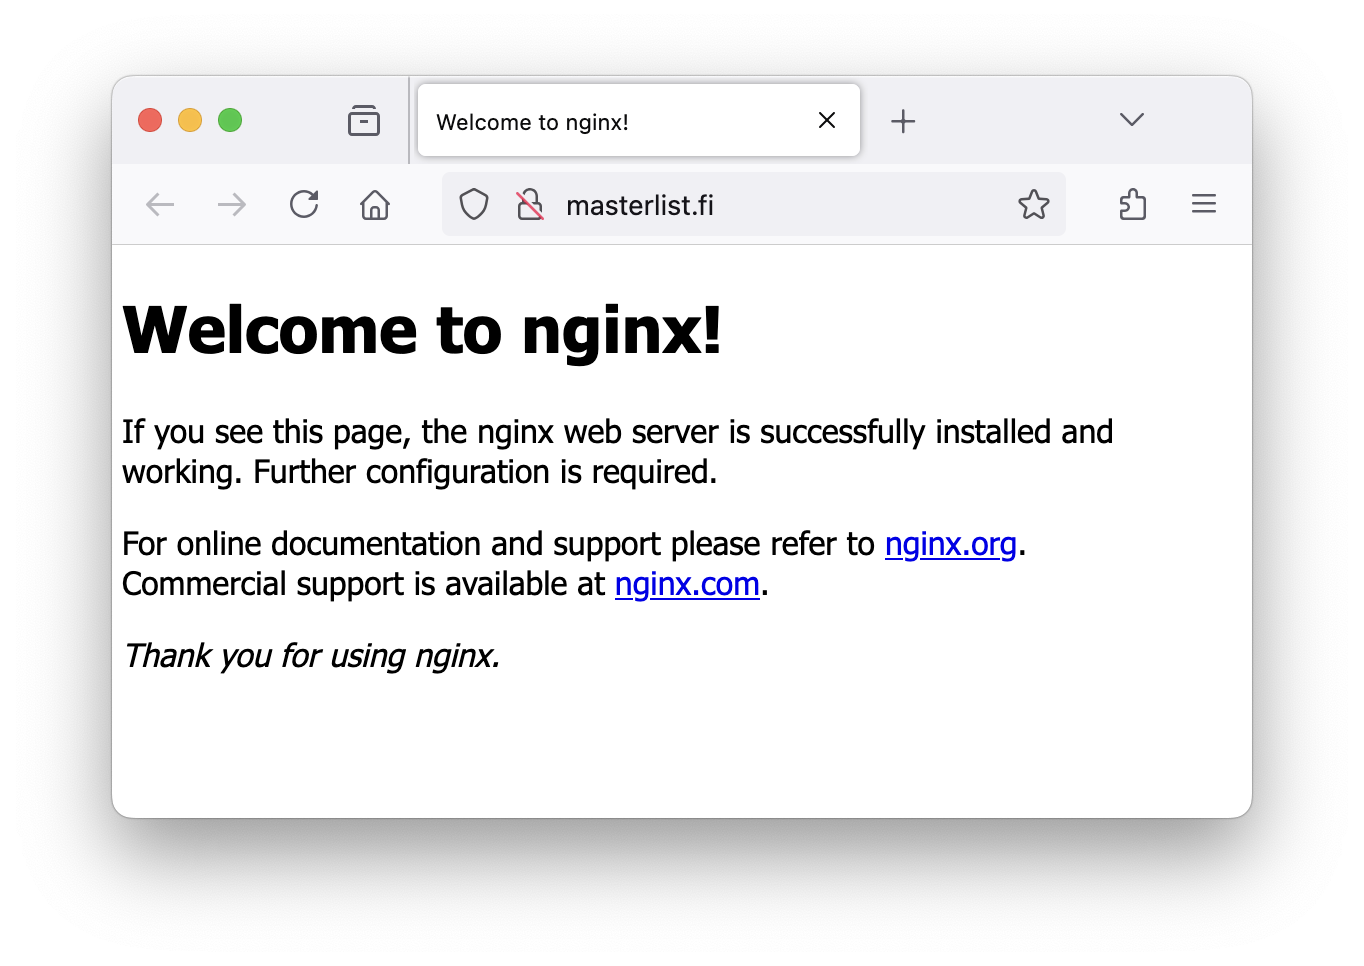
<p>When you open your domain with a browser, you will see the default Nginx welcome-screen.</p>

<div style="width: 100%; text-align: center;">
  <img style="width: 80%;" src="/images/nginx-welcome-screen.png" />
</div>

<h3 id="adding-a-web-site-to-nginx">Adding a web site to Nginx</h3>

<p>In Ubuntu Linux, Nginx web server lives in <code class="language-plaintext highlighter-rouge">/etc/nginx/</code>-directory. The main configuration file is <code class="language-plaintext highlighter-rouge">/etc/nginx/nginx.conf</code>.</p>

<p>To keep the main configuration file clean and simple, there are <code class="language-plaintext highlighter-rouge">/etc/nginx/sites-available</code> and <code class="language-plaintext highlighter-rouge">/etc/nginx/sites-enabled</code> directories to store the site-specific configuration files. They are also known as virtual hosts, you can have multiple virtual hosts running on one server. For example, you can have <code class="language-plaintext highlighter-rouge">example.com</code> and <code class="language-plaintext highlighter-rouge">anotherexample.com</code> sites running in one Nginx server. It also means you can run multiple Ruby on Rails applications in one server, as long as the server has enough memory and CPU capacity.</p>

<h2 id="nginx-configuration">Nginx configuration</h2>

<p>This is the Nginx configuration file for Ruby on Rails application. It is located in <code class="language-plaintext highlighter-rouge">/etc/nginx/sites-available</code> and then it’s symlinked to <code class="language-plaintext highlighter-rouge">/etc/nginx/sites-enabled</code>.</p>

<p>Create the file and then create the symlink with this:</p>

<div class="language-bash highlighter-rouge"><div class="highlight"><pre class="highlight"><code><span class="nv">$ </span><span class="nb">sudo ln</span> <span class="nt">-s</span> /etc/nginx/sites-available/masterlist /etc/nginx/sites-enabled/
</code></pre></div></div>

<p>Then remove the default virtual host configuration file from <code class="language-plaintext highlighter-rouge">sites-enabled/</code>:</p>

<div class="language-bash highlighter-rouge"><div class="highlight"><pre class="highlight"><code><span class="nv">$ </span><span class="nb">sudo rm</span> /etc/nginx/sites-enabled/default
</code></pre></div></div>

<p>The virtual host configuration file has following directives:</p>
<ul>
  <li>Defines the domains to listen for (in this case, it’s masterlist.fi)</li>
  <li>Configures the socket file to communicate with Puma</li>
  <li>Directive to server static assets directly from Nginx (no need for Puma to handle those)</li>
</ul>

<p>Example Nginx virtual host file:</p>

<div class="language-plaintext highlighter-rouge"><div class="highlight"><pre class="highlight"><code># /etc/nginx/sites-available/masterlist

upstream rails_app {
    server unix:///var/www/apps/masterlist/tmp/sockets/puma.sock fail_timeout=0;
}

server {
    server_name masterlist.fi;
    root /var/www/apps/masterlist/current/public;

    location ^~ /assets/ {
        gzip_static on;
        expires max;
        add_header Cache-Control public;
    }

    location = /favicon.ico { access_log off; log_not_found off; }
    location = /robots.txt  { access_log off; log_not_found off; }

    location / {
        proxy_pass http://rails_app;
        proxy_set_header X-Forwarded-For $proxy_add_x_forwarded_for;
        proxy_set_header Host $http_host;
        proxy_set_header X-Real-IP $remote_addr;
        proxy_redirect off;

        # WebSocket support (if needed)
        proxy_http_version 1.1;
        proxy_set_header Upgrade $http_upgrade;
        proxy_set_header Connection "upgrade";
    }
}

</code></pre></div></div>
<p>To test if the configuration files are valid, run the following:</p>

<div class="language-bash highlighter-rouge"><div class="highlight"><pre class="highlight"><code><span class="nv">$ </span><span class="nb">sudo </span>nginx <span class="nt">-t</span>
nginx: the configuration file /etc/nginx/nginx.conf syntax is ok
nginx: configuration file /etc/nginx/nginx.conf <span class="nb">test </span>is successful
</code></pre></div></div>

<p>If everything is working, you need to restart Nginx:</p>

<div class="language-bash highlighter-rouge"><div class="highlight"><pre class="highlight"><code><span class="nv">$ </span><span class="nb">sudo </span>systemctl restart nginx
</code></pre></div></div>

<p>To see the status of Nginx:</p>

<div class="language-bash highlighter-rouge"><div class="highlight"><pre class="highlight"><code><span class="nv">$ </span><span class="nb">sudo </span>systemctl status nginx
</code></pre></div></div>

<h2 id="securing-the-connection-with-lets-encrypt">Securing the connection with Let’s Encrypt</h2>

<div style="border: 1px solid #bf9d5a; background-color: lightyellow; padding: 0.5rem 1rem; margin-bottom: 1.5rem; border-radius: 0.45rem;">
  Please note, you need a server with public IP-address and a domain name pointing to that IP-adddress in order to continue.
</div>

<p>In order to secure the HTTP connection, you need to have SSL sertificate. Let’s Encrypt is a non-profit organization that provides free SSL-sertificates and they have a tools to automatically provision the sertificates. Before Let’s Encrypt, SSL sertificate management was hard and painful, and you had to buy the sertificate from commercial certificate authority.</p>

<p>With Let’s Encrypt, you just run few unix commands and you have a working SSL-sertificate securing your web applications. ❤️</p>

<p>Install a tool called <code class="language-plaintext highlighter-rouge">certbot</code> for certificate management. Follow the <a href="https://certbot.eff.org/instructions?ws=nginx&amp;os=ubuntubionic">installation instructions</a> on Certbot homepage.</p>

<p>You should see something similar in your terminal while creating the certificates:</p>

<div class="language-plaintext highlighter-rouge"><div class="highlight"><pre class="highlight"><code>Successfully deployed certificate for masterlist.fi to /etc/nginx/sites-enabled/masterlist
Successfully deployed certificate for www.masterlist.fi to /etc/nginx/sites-enabled/masterlist
</code></pre></div></div>

<p>Those lines mean that the <code class="language-plaintext highlighter-rouge">certbot</code> will make modifications in your virtual host configuration file.</p>

<p>Once you installed a SSL certificate, make sure to restart Nginx and open your URL with your browser. If you see a lock-symbol (🔒) on start of the address bar, you have HTTPS-connection.</p>

<p>You can test if the web server is responding by browsing to https://example.com, remember to use your own domain.</p>

<h2 id="running-you-ruby-on-rails-application-with-puma">Running you Ruby on Rails application with Puma</h2>

<h3 id="installing-ruby-for-your-deploy-user">Installing Ruby for your deploy user</h3>

<p>Your need Ruby to run your Ruby on Rails application, and you need to run Ruby as <code class="language-plaintext highlighter-rouge">deploy</code>-user. In order to have total control for your Ruby installation, you need to install it via Ruby package managers.</p>

<p>So first, let’s install <code class="language-plaintext highlighter-rouge">rbenv</code>, a Ruby version manager.</p>

<p>Follow <a href="https://github.com/rbenv/rbenv?tab=readme-ov-file#basic-git-checkout">the installation instructions</a> on rbenv homepage and come back to this article once you have Ruby running. Remember to install Ruby into your <code class="language-plaintext highlighter-rouge">deploy</code> user.</p>

<p>You can check if Ruby was installed correctly by running <code class="language-plaintext highlighter-rouge">which ruby</code>, the output should be:</p>

<div class="language-bash highlighter-rouge"><div class="highlight"><pre class="highlight"><code>bob@example:~<span class="nv">$ </span>which ruby
/home/deploy/.rbenv/shims/ruby
</code></pre></div></div>

<p>Remember to install <code class="language-plaintext highlighter-rouge">bundler</code> with:</p>

<div class="language-bash highlighter-rouge"><div class="highlight"><pre class="highlight"><code><span class="nv">$ </span>gem <span class="nb">install </span>bundler
</code></pre></div></div>

<h3 id="configuring-puma">Configuring Puma</h3>

<p>Puma needs some instructions so it can run your web application, so you need to create a file called <code class="language-plaintext highlighter-rouge">config/puma.rb</code> in your Ruby on Rails project in your local development environment.</p>

<p>In the example file below, the Puma is configured to communicate to Nginx using sockets. Log files will be written into <code class="language-plaintext highlighter-rouge">tmp/</code>-directory in your application root directory.</p>

<p>Word of warning, I have given zero thoughts on thread configuration, soso regarding thread counts for your appication, you have to do your own research. This file has some good defaults, so it’s a good starting point.</p>

<div class="language-ruby highlighter-rouge"><div class="highlight"><pre class="highlight"><code>
<span class="c1"># config/puma.rb</span>

<span class="k">if</span> <span class="no">ENV</span><span class="p">.</span><span class="nf">fetch</span><span class="p">(</span><span class="s2">"RAILS_ENV"</span><span class="p">,</span> <span class="kp">nil</span><span class="p">)</span> <span class="o">==</span> <span class="s2">"production"</span>
  <span class="n">environment</span> <span class="no">ENV</span><span class="p">.</span><span class="nf">fetch</span><span class="p">(</span><span class="s2">"RAILS_ENV"</span><span class="p">)</span> <span class="p">{</span> <span class="s2">"production"</span> <span class="p">}</span>
  <span class="n">directory</span> <span class="s1">'/var/www/apps/masterlist/current'</span>

  <span class="c1"># Set up socket and pid files</span>
  <span class="n">bind</span> <span class="s2">"unix:///var/www/apps/masterlist/tmp/sockets/puma.sock"</span>
  <span class="n">pidfile</span> <span class="s2">"/var/www/apps/masterlist/tmp/pids/puma.pid"</span>
  <span class="n">state_path</span> <span class="s2">"/var/www/apps/masterlist/tmp/pids/puma.state"</span>

  <span class="c1"># Logging</span>
  <span class="n">stdout_redirect</span> <span class="s2">"/var/www/apps/masterlist/logs/puma.stdout.log"</span><span class="p">,</span>
                  <span class="s2">"/var/www/apps/masterlist/logs/puma.stderr.log"</span><span class="p">,</span>
                  <span class="kp">true</span>

  <span class="c1"># Preload app for better performance</span>
  <span class="n">preload_app!</span>

  <span class="c1"># Handle worker boot</span>
  <span class="n">on_worker_boot</span> <span class="k">do</span>
    <span class="no">ActiveRecord</span><span class="o">::</span><span class="no">Base</span><span class="p">.</span><span class="nf">establish_connection</span> <span class="k">if</span> <span class="k">defined?</span><span class="p">(</span><span class="no">ActiveRecord</span><span class="p">)</span>
  <span class="k">end</span>

  <span class="c1"># Specify the PID file. Defaults to tmp/pids/server.pid in development.</span>
  <span class="c1"># In other environments, only set the PID file if requested.</span>
  <span class="n">pidfile</span> <span class="no">ENV</span><span class="p">[</span><span class="s2">"PIDFILE"</span><span class="p">]</span> <span class="k">if</span> <span class="no">ENV</span><span class="p">[</span><span class="s2">"PIDFILE"</span><span class="p">]</span>

  <span class="c1"># Allow puma to be restarted by `bin/rails restart` command.</span>
  <span class="n">plugin</span> <span class="ss">:tmp_restart</span>

  <span class="c1"># Run the Solid Queue supervisor inside of Puma for single-server deployments</span>
  <span class="n">plugin</span> <span class="ss">:solid_queue</span> <span class="k">if</span> <span class="no">ENV</span><span class="p">[</span><span class="s2">"SOLID_QUEUE_IN_PUMA"</span><span class="p">]</span>

  <span class="c1"># Workers (processes)</span>
  <span class="n">workers</span> <span class="no">ENV</span><span class="p">.</span><span class="nf">fetch</span><span class="p">(</span><span class="s2">"WEB_CONCURRENCY"</span><span class="p">)</span> <span class="p">{</span> <span class="mi">2</span> <span class="p">}</span>
<span class="k">end</span>

<span class="c1"># Threading configuration</span>
<span class="n">threads_count</span> <span class="o">=</span> <span class="no">ENV</span><span class="p">.</span><span class="nf">fetch</span><span class="p">(</span><span class="s2">"RAILS_MAX_THREADS"</span><span class="p">,</span> <span class="mi">3</span><span class="p">)</span>
<span class="n">threads</span> <span class="n">threads_count</span><span class="p">,</span> <span class="n">threads_count</span>

<span class="c1"># Specifies the `port` that Puma will listen on to receive requests; default is 3000.</span>
<span class="n">port</span> <span class="no">ENV</span><span class="p">.</span><span class="nf">fetch</span><span class="p">(</span><span class="s2">"PORT"</span><span class="p">,</span> <span class="mi">3000</span><span class="p">)</span>
</code></pre></div></div>

<h3 id="directory-structure-on-your-production-server">Directory structure on your production server</h3>

<p>Our application will live in <code class="language-plaintext highlighter-rouge">/var/www/apps/</code>. The <code class="language-plaintext highlighter-rouge">/var</code> directory contains things that will be changed over the time, such as log-files, web-sites, databases. It’s a good place for web applications as well.</p>

<p>The directory structure for Ruby on Rails application deployment looks like this:</p>

<div class="language-plaintext highlighter-rouge"><div class="highlight"><pre class="highlight"><code>.
└── apps
    └── masterlist
        ├── current -&gt; /var/www/apps/masterlist/releases/2024-11-22-13-30
        ├── logs
        ├── releases
        │   ├── 2024-11-21-07-45
        │   ├── 2024-11-21-09-11
        │   └── 2024-11-22-13-30
        ├── shared
        │   └── storage
        └── tmp
            ├── pids
            └── sockets
</code></pre></div></div>

<ul>
  <li><strong>current</strong> - This is a symbolic link to your latest deployment version of your application, in this case <code class="language-plaintext highlighter-rouge">current</code> points to <code class="language-plaintext highlighter-rouge">releases/2024-11-22-13-30</code> directory.</li>
  <li><strong>logs</strong> - Puma will write two log files, accesses and errors, and both files are in this directory</li>
  <li><strong>releases</strong> - This directory contains all deployed versions of your application, everytime you want to deploy a new version of you application, just create a directory and copy all files from your local development environment to here</li>
  <li><strong>shared</strong> - All files that will not change between deployments are stored here, the database of your application is placed here so it won’t be erased in every deployment</li>
  <li><strong>tmp</strong> - Temporary files, there are files related to the Puma processes, and cache files</li>
</ul>

<p>The <code class="language-plaintext highlighter-rouge">releases/</code>-directory is the core of the deployment process. Each deployment gets own directory and the <code class="language-plaintext highlighter-rouge">current/</code>-directory contains the files of newest deployment because it is always symlinked to the latest directory in <code class="language-plaintext highlighter-rouge">releases/</code>.</p>

<h3 id="first-deployment">First deployment</h3>

<p>Let’s do everything manually for the first deployment. Once everything is working, then sprinkle some automation via bash script.</p>

<p>Create all the required directories mentioned earlier. In this example, the application is called <code class="language-plaintext highlighter-rouge">masterlist</code>, change it to match your own application. Also make sure that the directories are owned by the <code class="language-plaintext highlighter-rouge">deploy</code>-user account.</p>

<div class="language-bash highlighter-rouge"><div class="highlight"><pre class="highlight"><code><span class="nv">$ </span><span class="nb">cd</span> /var/www
<span class="nv">$ </span><span class="nb">sudo mkdir </span>apps
<span class="nv">$ </span><span class="nb">cd </span>apps
<span class="nv">$ </span><span class="nb">sudo mkdir</span> <span class="nt">-p</span> masterlist
<span class="nv">$ </span><span class="nb">sudo mkdir</span> <span class="nt">-p</span> masterlist/logs
<span class="nv">$ </span><span class="nb">sudo mkdir</span> <span class="nt">-p</span> masterlist/tmp/pids
<span class="nv">$ </span><span class="nb">sudo mkdir</span> <span class="nt">-p</span> masterlist/tmp/sockets
<span class="nv">$ </span><span class="nb">sudo mkdir</span> <span class="nt">-p</span> masterlist/shared/storage
<span class="nv">$ </span><span class="nb">sudo mkdir</span> <span class="nt">-p</span> masterlist/releases
<span class="nv">$ </span><span class="nb">sudo chown</span> <span class="nt">-R</span> deploy:deploy masterlist <span class="c"># make sure the `deploy`-user owns the directories</span>
</code></pre></div></div>

<h4 id="timestamping-the-deployment-aka-release-and-copying-files-for-local-development-environment">Timestamping the deployment (a.k.a. release) and copying files for local development environment</h4>

<p>There is a unix command called <code class="language-plaintext highlighter-rouge">date</code> which we can use to generate the timestamp of current time.</p>

<div class="language-plaintext highlighter-rouge"><div class="highlight"><pre class="highlight"><code>$ date +"%Y-%m-%d-%H-%M-%S"
2024-11-22-14-44-59
</code></pre></div></div>

<p>The format is <code class="language-plaintext highlighter-rouge">year-month-day-hours-minutes-seconds</code> and it gives your pretty good guarantee that each deployment will have an unique directory.</p>

<p>With the new timestamp, let’s create a directory inside the <code class="language-plaintext highlighter-rouge">releases/</code>-directory.</p>

<div class="language-bash highlighter-rouge"><div class="highlight"><pre class="highlight"><code><span class="nv">$ </span><span class="nb">cd</span> /var/www/apps/masterlist
<span class="nv">$ </span><span class="nb">mkdir </span>releases/2024-11-22-14-44-59
</code></pre></div></div>

<p>Copy the files from local development environment to production server. Use <code class="language-plaintext highlighter-rouge">scp</code> which is a part of SSH toolkit. In your local development environment, switch to the directory of the application and run following command.</p>

<div class="language-bash highlighter-rouge"><div class="highlight"><pre class="highlight"><code><span class="c"># this following command MUST be run on your local development environment (a.k.a. your own computer)</span>
<span class="c"># remember to change the timestamp, the user and the server</span>
<span class="nv">$ </span>rsync <span class="nt">-av</span> <span class="se">\</span>
  <span class="nt">--exclude-from</span><span class="o">=</span><span class="s1">'.gitignore'</span> <span class="se">\</span>
  <span class="nt">--exclude</span> <span class="s1">'.git'</span> <span class="se">\</span>
  <span class="nt">--exclude</span> <span class="s1">'log/*'</span> <span class="se">\</span>
  <span class="nt">--exclude</span> <span class="s1">'tmp/*'</span> <span class="se">\</span>
  <span class="nt">--exclude</span> <span class="s1">'storage/*'</span> <span class="se">\</span>
  <span class="nt">--exclude</span> <span class="s1">'node_modules'</span> <span class="se">\</span>
  <span class="nt">--exclude</span> <span class="s1">'public/assets'</span> <span class="se">\</span>
  <span class="nt">--exclude</span> <span class="s1">'public/packs'</span> <span class="se">\</span>
  <span class="nt">--exclude</span> <span class="s1">'config/credentials/*.key'</span> <span class="se">\</span>
  <span class="nt">--exclude</span> <span class="s1">'config/master.key'</span> <span class="se">\</span>
  <span class="nt">--exclude</span> <span class="s1">'.env*'</span> <span class="se">\</span>
  <span class="nt">--exclude</span> <span class="s1">'spec'</span> <span class="se">\</span>
  <span class="nt">--exclude</span> <span class="s1">'test'</span> <span class="se">\</span>
  <span class="nt">--exclude</span> <span class="s1">'.rspec'</span> <span class="se">\</span>
  <span class="nt">--exclude</span> <span class="s1">'coverage'</span> <span class="se">\</span>
  <span class="nt">--exclude</span> <span class="s1">'.DS_Store'</span> <span class="se">\</span>
  <span class="nt">--exclude</span> <span class="s1">'*.sqlite3'</span> <span class="se">\</span>
  <span class="nt">--progress</span> <span class="se">\</span>
  <span class="nt">--delete</span> <span class="se">\</span>
  ./ deploy@masterlist.fi:/var/www/apps/masterlist/releases/2024-11-27-11-14-44
</code></pre></div></div>

<p>Back on the production server, we can create the symbolic link (a.k.a. symlink).</p>

<div class="language-bash highlighter-rouge"><div class="highlight"><pre class="highlight"><code><span class="c"># make sure you are in /var/www/apps/masterlist directory</span>
<span class="nv">$ </span><span class="nb">ln</span> <span class="nt">-sf</span> releases/2024-11-27-11-14-44/ current
</code></pre></div></div>

<p>Install gems for your application</p>

<div class="language-bash highlighter-rouge"><div class="highlight"><pre class="highlight"><code><span class="nv">$ </span><span class="nb">cd </span>current
<span class="nv">$ </span>bundle <span class="nb">install</span>
</code></pre></div></div>

<p>Copy <code class="language-plaintext highlighter-rouge">master.key</code> from you local development environment into the <code class="language-plaintext highlighter-rouge">shared/</code>-directory on your production server.</p>

<div class="language-bash highlighter-rouge"><div class="highlight"><pre class="highlight"><code><span class="c"># this will be run on your local development environment</span>
<span class="nv">$ </span>scp config/master.key deploy@masterlist.fi:/var/www/apps/masterlist/shared/master.key
</code></pre></div></div>

<p>Everything is ready for Puma to run your Ruby on Rails application from <code class="language-plaintext highlighter-rouge">current/</code>-directory and store the database in <code class="language-plaintext highlighter-rouge">shared/storage</code>.</p>

<p>You can test that everything works by running <code class="language-plaintext highlighter-rouge">rails console</code> in <code class="language-plaintext highlighter-rouge">current/</code>-directory. In production server, your application will run in production-mode, therefore we have to use <code class="language-plaintext highlighter-rouge">RAILS_ENV=production</code> everytime we run any rails commands.</p>

<div class="language-bash highlighter-rouge"><div class="highlight"><pre class="highlight"><code><span class="nv">$ </span><span class="nb">cd </span>current
<span class="nv">$ RAILS_ENV</span><span class="o">=</span>production bin/rails console
</code></pre></div></div>

<p>But before that, we need to setup the ruby on rails application.</p>

<h3 id="setting-up-the-application">Setting up the application</h3>

<p>Create the database by running the database migrations. Make sure you are running the migrations in production mode by prefixing the command with <code class="language-plaintext highlighter-rouge">RAILS_ENV=production</code>.</p>

<div class="language-bash highlighter-rouge"><div class="highlight"><pre class="highlight"><code><span class="nv">$ </span><span class="nb">cd</span> /var/www/apps/masterlist/current
<span class="nv">$ RAILS_ENV</span><span class="o">=</span>production bin/rails db:create
<span class="nv">$ RAILS_ENV</span><span class="o">=</span>production bin/rails db:migrate
</code></pre></div></div>

<p>Then you have to compile all assets so they become static assets, to be served by Nginx.</p>

<div class="language-bash highlighter-rouge"><div class="highlight"><pre class="highlight"><code><span class="nv">$ RAILS_ENV</span><span class="o">=</span>production bin/rails assets:precompile
</code></pre></div></div>
<p>Again, make sure you’re in production environment by writing <code class="language-plaintext highlighter-rouge">RAILS_ENV=production</code> before <code class="language-plaintext highlighter-rouge">bin/rails assets:precompile</code>.</p>

<h2 id="test-run-with-puma">Test run with Puma</h2>

<p>Finally it’s time to start the Ruby on Rails application and that’s the job for Puma. To test that everything works, first let’s start our application manually.</p>

<div class="language-bash highlighter-rouge"><div class="highlight"><pre class="highlight"><code><span class="nv">$ </span><span class="nb">cd</span> /var/www/apps/masterlist/current
<span class="nv">$ RAILS_ENV</span><span class="o">=</span>production bundle <span class="nb">exec </span>puma <span class="nt">-C</span> config/puma.rb
</code></pre></div></div>

<p>The output should look something like this:</p>
<div class="language-plaintext highlighter-rouge"><div class="highlight"><pre class="highlight"><code>[191034] Puma starting in cluster mode...
[191034] * Puma version: 6.4.3 (ruby 3.3.3-p89) ("The Eagle of Durango")
[191034] *  Min threads: 5
[191034] *  Max threads: 5
[191034] *  Environment: production
[191034] *   Master PID: 191034
[191034] *      Workers: 2
[191034] *     Restarts: (✔) hot (✖) phased
[191034] * Preloading application
[191034] * Listening on unix:///var/www/apps/masterlist/tmp/sockets/puma.sock
[191034] Use Ctrl-C to stop
</code></pre></div></div>

<p>The line <code class="language-plaintext highlighter-rouge">Listening on unix:///var/www/apps/masterlist/tmp/sockets/puma.sock</code> means that now Nginx and Puma have a way for communicating with each other.</p>

<p>Puma is now running, but you have to manually monitor the Puma process and restart it if it crashes.</p>

<h2 id="unix-process-management-with-systemd">Unix process management with Systemd</h2>

<p>Ubuntu Linux uses systemd for process management. It starts processes, it stops badly behaving processes, it makes sure processes keep running and if they crash, it restarts them.</p>

<p>Systemd is configured in <code class="language-plaintext highlighter-rouge">/etc/systemd</code>-directory. There is a directory called <code class="language-plaintext highlighter-rouge">/etc/systemd/system</code> that contains configuration files for all processes that need managing. It has a huge role of Linux operating system, things need to be running, spice must flow.</p>

<p>For each Ruby on Rails project that is run on the server, it needs a file in <code class="language-plaintext highlighter-rouge">/etc/systemd/system</code>-directory.</p>

<p>Create a file in this directory and name it after your application. In this example the name of the service file is <code class="language-plaintext highlighter-rouge">masterlist.service</code>.</p>

<div class="language-plaintext highlighter-rouge"><div class="highlight"><pre class="highlight"><code>[Unit]
Description=Masterlist (Puma Rails Server)
After=network.target

[Service]
Type=simple
User=deploy
WorkingDirectory=/var/www/apps/masterlist/current
Environment=RAILS_ENV=production
ExecStart=/home/deploy/.rbenv/shims/bundle exec puma -C config/puma.rb
Restart=always

[Install]
WantedBy=multi-user.target
</code></pre></div></div>

<p>Create the service file with using <code class="language-plaintext highlighter-rouge">systemctl</code> tool.</p>

<div class="language-bash highlighter-rouge"><div class="highlight"><pre class="highlight"><code><span class="nv">$ </span><span class="nb">sudo </span>systemctl edit <span class="nt">--force</span> <span class="nt">--full</span> masterlist.service
</code></pre></div></div>

<p>Enable the service and start it too</p>

<div class="language-bash highlighter-rouge"><div class="highlight"><pre class="highlight"><code><span class="nv">$ </span><span class="nb">sudo </span>systemctl <span class="nb">enable</span> <span class="nt">--now</span> masterlist
</code></pre></div></div>

<p>Query the status of the service:</p>

<div class="language-bash highlighter-rouge"><div class="highlight"><pre class="highlight"><code><span class="nv">$ </span><span class="nb">sudo </span>systemctl status masterlist
</code></pre></div></div>

<p>In case you need to start or stop the service</p>

<div class="language-bash highlighter-rouge"><div class="highlight"><pre class="highlight"><code><span class="nv">$ </span><span class="nb">sudo </span>systemctl start masterlist
<span class="nv">$ </span><span class="nb">sudo </span>systemctl stop masterlist
<span class="nv">$ </span><span class="nb">sudo </span>systemctl restart masterlist <span class="c"># stop the service and start it again</span>
</code></pre></div></div>

<p>If you need to do some troubleshooting, you can find the logs in <code class="language-plaintext highlighter-rouge">/var/www/apps/masterlist/logs</code>.</p>

<p>Sometimes it helps troubleshooting when you open another terminal window and watch the logs in real-time.</p>

<div class="language-bash highlighter-rouge"><div class="highlight"><pre class="highlight"><code><span class="nv">$ </span><span class="nb">tail</span> <span class="nt">-100f</span> /var/www/apps/masterlist/logs/puma.stdout.log
</code></pre></div></div>

<p>Press <code class="language-plaintext highlighter-rouge">Control-C</code> to exit the logs.</p>

<h2 id="automating-the-deployment">Automating the deployment</h2>

<p>The server is set up, Nginx is running, Let’s Encrypt is keeping the connection secure and Puma is hosting Ruby on Rails application. If you do the deployment manually, there are so many steps and so many opportunities to mess things up. I’d suggest you automate that part into a shell script.</p>

<p>To deploy, the newest version of the application is copied to the server into directory that get’s it’s name from timestamp, and it’s then symlinked to <code class="language-plaintext highlighter-rouge">current/</code>. After that the assets are compiled into <code class="language-plaintext highlighter-rouge">public/</code>-directory for Nginx to directly host them.</p>

<p>I have the following file in my Ruby on Rails application <code class="language-plaintext highlighter-rouge">bin/</code>-directory along with Ruby on Rails default commands. I’ve called it <code class="language-plaintext highlighter-rouge">bin/deplou</code> since it’s not the perfect deployment system but it works for me.</p>

<div class="language-plaintext highlighter-rouge"><div class="highlight"><pre class="highlight"><code>#!/usr/bin/env sh

# Configure your server and application settings

# IP address or domain addres for your production server
REMOTE_SERVER=188.34.189.36

# User that does the deploy
REMOTE_USER=deploy

# I've found out it's much easier for me to enforce the Ruby version on the server,
# then keep all version numbers in sync
RUBY_VERSION="3.3.3"

# Where you application is located in production server
REMOTE_APP_DIR=/var/www/apps/masterlist

# You shouldn't need to change anything below

TIMESTAMP=`date +"%Y-%m-%d-%H-%M-%S"`


CURRENT_DIR=$REMOTE_APP_DIR/current
DESTINATION_DIR=$REMOTE_APP_DIR/releases/$TIMESTAMP

SECRET_KEY_FILE=config/master.key
STORAGE_DIR=$REMOTE_APP_DIR/shared/storage

DATA_DIR=$REMOTE_APP_DIR/shared/videos
PUBLIC_DIR=$CURRENT_DIR/public


run_ssh() {
    local command=$1
    ssh $REMOTE_USER@$REMOTE_SERVER "bash -l -c 'source ~/.bashrc &amp;&amp; eval \"\$(~/.rbenv/bin/rbenv init -)\" &amp;&amp; ${command}'"
}

# copy files into new folder (ignore a bunch of directories)
echo "Copying files from local development to production server"
rsync -av \
  --exclude-from='.gitignore' \
  --exclude '.git' \
  --exclude 'log/*' \
  --exclude 'tmp/*' \
  --exclude 'storage/*' \
  --exclude 'node_modules' \
  --exclude 'public/assets' \
  --exclude 'public/packs' \
  --exclude 'config/credentials/*.key' \
  --exclude 'config/master.key' \
  --exclude '.env*' \
  --exclude 'spec' \
  --exclude 'test' \
  --exclude '.rspec' \
  --exclude 'coverage' \
  --exclude '.DS_Store' \
  --exclude '*.sqlite3' \
  --progress \
  --delete \
  ./ $REMOTE_USER@$REMOTE_SERVER:$DESTINATION_DIR

# copy credentials
echo "Copying credentials..."
run_ssh "cp ${REMOTE_APP_DIR}/shared/master.key ${DESTINATION_DIR}/config/master.key"

# Enforce running correct ruby version on $remote
echo "Enforcing Ruby ${RUBY_VERSION} version..."
run_ssh "cd ${DESTINATION_DIR} &amp;&amp; echo ${RUBY_VERSION} &gt; .ruby-version"

# Bundle gems
echo "Running 'bundle'"
run_ssh "cd ${DESTINATION_DIR} &amp;&amp; which ruby"
run_ssh "cd ${DESTINATION_DIR} &amp;&amp; bundle exec bundle"

# build assets
echo "Build assets..."
run_ssh "cd ${DESTINATION_DIR} &amp;&amp; RAILS_ENV=production bundle exec rails assets:precompile"

# create symlinks
echo "Creating symlink ${DESTINATION_DIR} =&gt; ${CURRENT_DIR}"
run_ssh "ln -nsf ${DESTINATION_DIR} ${CURRENT_DIR}"

echo "Creating symlink ${DESTINATION_DIR}/storage =&gt; ${STORAGE_DIR}"
run_ssh "rm -fR ${DESTINATION_DIR}/storage &amp;&amp; ln -nsf ${STORAGE_DIR} ${DESTINATION_DIR}/storage"

echo "Restart Puma"
run_ssh "pumactl -P ${REMOTE_APP_DIR}/tmp/pids/puma.pid restart"
</code></pre></div></div>

<p>And there you go! You’ve reached the end of this long article. Everytime you want to deploy your changes, just run <code class="language-plaintext highlighter-rouge">bin/deplou</code> in your Ruby on Rails application root directory.</p>

<h2 id="final-words">Final words</h2>

<p>Here are some things to consider if you start using this way of deployment</p>

<ul>
  <li>It bypasses version control completely, so you have to make sure you commit your source code into repository</li>
  <li>The backups are crucial, especially if you have client data, find out way to do regular backups and store the backups somewhere safe (do some research on “3-2-1 backup rule”)</li>
  <li>Make sure you monitor your system, <a href="https://github.com/igorkasyanchuk/rails_performance">rails_performance</a> gem might be the thing you need</li>
  <li>The log files will eventually fill your hard drive and your server will hang, unless you configure a log rotation scheme for your Puma logs and Nginx Logs – Here is a tutorial <a href="https://betterstack.com/community/guides/logging/how-to-manage-log-files-with-logrotate-on-ubuntu-20-04/#final-thoughts">how to manage logs with logrotate</a></li>
</ul>

<p>There you go, have fun storming the castle! 🙂</p>]]></content><author><name></name></author><summary type="html"><![CDATA[This blog post describes how to manually set up and deploy your Ruby on Rails 8 application on a Linux Server with as few dependencies as possible. It’s all manual, there is no automations or containers. No Cloud orchestration. It’s just you and your Linux server.]]></summary></entry><entry><title type="html">Ruby on Rails Snippets I Find Helpful at the Start of a Project</title><link href="https://www.jomppanen.com/2024/07/07/ruby-on-rails-snippets-at-start-or-project.html" rel="alternate" type="text/html" title="Ruby on Rails Snippets I Find Helpful at the Start of a Project" /><published>2024-07-07T00:00:00+00:00</published><updated>2024-07-07T00:00:00+00:00</updated><id>https://www.jomppanen.com/2024/07/07/ruby-on-rails-snippets-at-start-or-project</id><content type="html" xml:base="https://www.jomppanen.com/2024/07/07/ruby-on-rails-snippets-at-start-or-project.html"><![CDATA[<h2 id="how-to-use-custom-fonts-and-host-them-from-assets-directory">How to use custom fonts and host them from assets directory</h2>

<p>First, introduce a new folder called <code class="language-plaintext highlighter-rouge">fonts</code> into assets. You also need to create the folder.</p>

<div class="language-plaintext highlighter-rouge"><div class="highlight"><pre class="highlight"><code># config/application.rb
config.assets.paths &lt;&lt; Rails.root.join("app", "assets", "fonts")
</code></pre></div></div>

<p>Then, setup a folder structure with the font assets your want to use. Put the file that contains all <code class="language-plaintext highlighter-rouge">@font-face</code> declarations into <code class="language-plaintext highlighter-rouge">app/assets/stylesheets</code>.</p>

<p>I’m using <a href="https://rsms.me/inter/">Inter</a> and it has a CSS file with all font-faces. I’ve moved the CSS file into <code class="language-plaintext highlighter-rouge">app/asserts/stylesheets/vendor</code>, I like my stylesheets neat and structured.</p>

<p>Here is the folder structure:</p>

<div class="language-plaintext highlighter-rouge"><div class="highlight"><pre class="highlight"><code># app/assets/

.
├── builds/
├── config/
├── fonts/
│   └── Inter-3.19
│       ├── Inter-Black.woff
│       ├── Inter-Black.woff2
│       ├── ...
│       ├── ...
│       └── Inter.var.woff2
├── images/
└── stylesheets/
    ├── application.sass.scss
    └── vendor
        └── inter-3.19.scss
</code></pre></div></div>

<p>Make sure the <code class="language-plaintext highlighter-rouge">@font-face</code> declarations point into correct folder.</p>

<p>For my needs, I need to add <code class="language-plaintext highlighter-rouge">Inter-3.19</code> into each font-face url since it’s located in subfolder in <code class="language-plaintext highlighter-rouge">fonts</code>-folder.</p>

<p>Find and replace all occurences of
<code class="language-plaintext highlighter-rouge">src: url("Inter-roman.var.woff2?v=3.19") format("woff2");</code>
with
<code class="language-plaintext highlighter-rouge">src: url("Inter-3.19/Inter-roman.var.woff2?v=3.19") format("woff2");</code></p>

<p>Finally, import the fonts in your CSS. Add the following into your root CSS file.</p>

<div class="language-plaintext highlighter-rouge"><div class="highlight"><pre class="highlight"><code>@use 'vendor/Inter-3.19';
</code></pre></div></div>

<h2 id="setup-rotating-logs-in-production">Setup rotating logs in production</h2>

<p>Prevent your log files growing too big and filling up your server storage.</p>

<div class="language-plaintext highlighter-rouge"><div class="highlight"><pre class="highlight"><code># config/environments/production.rb
config.logger = Logger.new(config.paths["log"].first, "weekly")
</code></pre></div></div>

<h2 id="install-language-server-for-ruby-and-ruby-on-rails">Install language server for Ruby and Ruby on Rails</h2>

<div class="language-plaintext highlighter-rouge"><div class="highlight"><pre class="highlight"><code>bundle add ruby-lsp-rails
</code></pre></div></div>

<p>Your editor should pick it up automatically, at least Sublime Text does it.</p>

<h2 id="email-configuration-for-development-environment">Email configuration for development environment</h2>

<p>I’m using <a href="httpw://mailcatcher.me">Mailcatcher</a> to do my email styling in development mode.</p>

<p>First, install <code class="language-plaintext highlighter-rouge">mailcatcher</code> gem.</p>

<div class="language-plaintext highlighter-rouge"><div class="highlight"><pre class="highlight"><code>gem install mailcatcher
</code></pre></div></div>

<p>Setup the mail configuration in development.</p>

<div class="language-plaintext highlighter-rouge"><div class="highlight"><pre class="highlight"><code># config/environments/development.rb

config.action_mailer.delivery_method = :smtp
config.action_mailer.smtp_settings = { address: "127.0.0.1", port: 1025 }
config.action_mailer.raise_delivery_errors = false
</code></pre></div></div>

<p>Add mailcatcher in your development Procfile. There are similar gems out there, but mailcatcher fits me needs perfectly. 👌</p>

<div class="language-plaintext highlighter-rouge"><div class="highlight"><pre class="highlight"><code># Procfile.dev
mail: mailcatcher --foreground
</code></pre></div></div>

<p>The <code class="language-plaintext highlighter-rouge">--foreground</code> switch keeps it running in same process and does not daemonize it into background. This way <code class="language-plaintext highlighter-rouge">Foreman</code> is able to stop <code class="language-plaintext highlighter-rouge">mailcatcher</code> process along with other processed defined in <code class="language-plaintext highlighter-rouge">Procfile.dev</code>.</p>

<h2 id="closing-thoughts">Closing thoughts</h2>

<p>This blog post is written entirely for me. This saves me from searching the answers from  internet everytime I start a new project.</p>

<p>Some of thos snippets are very simple, but I cannot seem to memorize them into my brain. I still have to search bunch of simple stuff when programming. For example, the class that I need to inherit from when writing a unit test, I just don’t remember it.</p>

<p>By the way, it’s <code class="language-plaintext highlighter-rouge">ActiveSupport::TestCase</code>.</p>]]></content><author><name></name></author><summary type="html"><![CDATA[When I'm starting a new Ruby on Rails project, these are few snippets that I find helpful]]></summary></entry><entry><title type="html">Frequently Asked Questions about Internet Domain Names and Websites</title><link href="https://www.jomppanen.com/2024/03/10/frequently-asked-questions-about-internet-domain-names-and-websites.html" rel="alternate" type="text/html" title="Frequently Asked Questions about Internet Domain Names and Websites" /><published>2024-03-10T00:00:00+00:00</published><updated>2024-03-10T00:00:00+00:00</updated><id>https://www.jomppanen.com/2024/03/10/frequently-asked-questions-about-internet-domain-names-and-websites</id><content type="html" xml:base="https://www.jomppanen.com/2024/03/10/frequently-asked-questions-about-internet-domain-names-and-websites.html"><![CDATA[<p>
  I regularly find myself in conversations where people ask me questions about internet domain names and websites. Where to buy them? Are they actually useful? How do I get a website running on a domain?
</p>
<p>
  It&#39;s sounds like a perfect opportunity to write a FAQ for people who are new to internet domains!
</p>
<p>
  Please note that Internet is in constant change. This blog post was written in early March in 2024. So if you&#39;re reading this in 2043, some details most likely are completely wrong.
</p>

<h2 id="what-is-internet-domain-name-">What is Internet Domain Name?</h2>
<p>
  Each computer connected to Internet (a.k.a. a server) has a IP-address. It&#39;s like a phone number. Your server has to have one, otherwise other computers cannot connect to it. Google and Facebook servers have IP-addresses. An IP-address is four numbers between 0-255, such as <code>130.231.240.1</code> which is the IP-address of University of Oulu, <a href="https://en.wikipedia.org/wiki/IRC#History">the birthplace of IRC</a>.
</p>
<p>
  Internet domain name is a human-friendly name for the IP-address. It&#39;s easier to remember Oulu.fi than <code>130.231.240.1</code>. So when you type www.jomppanen.com in the address bar, the browser will ask from the DNS (Domain Name System) what&#39;s the IP-address for that address. The DNS replies with IP-address, and the browser opens a connection to the web server and you will see a website.
</p>
<p>
  The DNS records contains over 359.8 million domain names (Dec 2023). That is a lot of domain names!
</p>

<h2 id="why-should-a-company-own-an-internet-domain-">Why should a company own an internet domain?</h2>
<p>
  A business needs a website. A business needs a brand. The internet domain name is a core building block for your brand. It is non-negotiable, you need it.
</p>
<p>
  If you are building a business, you also need an email address. Don&#39;t use <code>@gmail</code> or <code>@hotmail.com</code> emails. It&#39;s bad for your professional credibility if you run your business as <code>waynethehockeywizard99@gmail.com</code>.
</p>

<h2 id="what-are-tld-s-a-k-a-top-level-domains-">What are TLD&#39;s a.k.a. top-level domains?</h2>
<p>
  When Internet was invented <a href="https://en.wikipedia.org/wiki/History_of_the_Internet">back in the day</a>, there were only handful of top-level domains (TLD&#39;s), such as <code>.com</code>, <code>.org</code>, <code>.edu</code>, <code>.mil</code>. Since then, there are hundreds of TLD&#39;s with different kind of requirements. Pretty much all countries in the world have their own TLD, such as <code>.fi</code> and <code>.ai</code>, they are called ccTLD (country code TLD).
</p>
<p>
  Some countries strike a gold mine with their TLD. Antigua from the Caribbean got $30 million dollar revenue in 2023 (reportedly!) from their country code TLD called <code>.ai</code>.
</p>
<p>
  Like I said, there are hundreds of TLD&#39;s to choose from. But even in 2024, the best TLD (a.k.a. the part after last period) is still <code>.com</code>, try to get it and if it taken, go with other TLD&#39;s.
</p>

<h2 id="where-to-buy-a-domain-">Where to buy a domain?</h2>
<p>
  There are lots of domain registrars where to buy a internet domain, and their quality of service can be anything. I&#39;ve owned domains over 20 years, and here are few my personal guidelines that I <em>try</em> to follow:
</p>
<ul>
  <li>
    <strong>Use several registrants</strong> - A cheap way to diversify the risk. If one of your registrants have problems, you still have other domains that you can operate.
  </li>
  <li>
    <strong>Hide your personal details</strong> - Pick a registrant that will hide your personal information from the DNS records. Never use your own personal email in the records, use a technical email such as <code>domains@example.com</code>.
  </li>
  <li>
    <strong>Registrant in same country</strong> - Try to pick a domain registrant that is located in same country as you, it makes things easier if you encounter any problems. Also, speaking a same language with your domain registrant is very helpful too.
  </li>
</ul>
<p>
  The domain registrants that I have found to be good:
</p>
<ul>
  <li>
    <a href="https://shellit.org">Shellit.org</a> - Located in Finland, speaks Finnish, so it&#39;s a great match for people living in Finland
  </li>
  <li>
    <a href="https://dnsimple.com">DNSimple</a> - When the started, their target audience were programmers. Now they are bigger so their target audience is more generic. They are a bit more expensive than others.
  </li>
  <li>
    <a href="https://www.namecheap.com">Namecheap</a> - This is a big player, and they have a good tool for generating domain names, and the tool is free to use.
  </li>
</ul>
<p>
  There are so many domain registrants all over the internet. Try &quot;domain registrant&quot; as keywords on your favourite search engine and add your city or country at the end of keywords. I would search for <code>&quot;domain registrant oulu&quot;</code> or <code>&quot;domain registrant finland&quot;</code> since I live in Oulu, Finland.
</p>
<p>
  Remember, when you buy a domain you also have to renew it each year. If the domain is important to you, make sure that you have automatic renewal turned on and the payment goes through every year.
</p>
<p>
  <strong>If you fail to pay for the domain at the end of billing cycle, you will lose it.</strong>
</p>
<p>
  If you don&#39;t need the domain anymore, you can resell it or just let it expire.
</p>

<h2 id="what-is-a-good-domain-name-">What is a good domain name?</h2>
<p>
  A good domain name is what your visitors remember even in their sleep. But the domain name itself is not the important part. Your website must provide enough value to your visitors, that they will type the domain on a mobile phone in the middle of Finnish winter, at -25°C.
</p>
<p>
  When you are researching for possible domain names, and you find a domain name that has <code>.com</code> , <code>.fi</code> and <code>.net</code> available, don&#39;t hesitate for a second. Grab all three domain names. The most important TLD is <code>.com</code>.
</p>
<p>
  Since there are over 390 million domain names, most likely your preferred domain is taken. If that is the case, then you have to get creative. Add a prefix or a postfix, or something. Back in the day, I came up with <code>tinyinvoice.com</code> since <code>invoice.com</code> was taken.
</p>
<p>
  Don&#39;t get too creative. A good way to test if a domain name is good, is to explain it to your friends or family. Think about the difference between <code>masterlist.fi</code> and <code>masterli.st</code>, which one is easier to explain? Test the waters before buying it.
</p>

<h2 id="dns-is-the-system-that-runs-internet">DNS is the system that runs Internet</h2>
<p>
  The Domain Name System is the system that runs the modern world.  It&#39;s the global phone book. If your computer or mobile device has a Internet connection, it can connect to DNS. It&#39;s a distributed system that has &quot;nodes&quot; all over the world.
</p>
<p>
  The nodes are connected to root servers. There are 13 DNS root servers that are the authoritative source of trust for domain names.
</p>
<p>
  When you buy a domain name, the domain registrant is responsible to inform the DNS about a new domain name. When you make any changes to DNS records of your domain (for example, changing a <code>CNAME</code>), it takes few moments for the information spread around all the nodes in the DNS. Sometimes it may even take 24 hours until the changes are propagated all over the world.
</p>
<p>
  Most domain registrars and DNS services have a time-to-live (TTL) component for a DNS record. This number means that how many seconds the record is cached before the information is refreshed. If your TTL is set to 300, it means that any change you make to your domain DNS-records takes about 5 minutes (300 seconds / 60seconds) until the change take effect all over the DNS nodes on Internet.
</p>
<p>
  If you know you are about to make big changes to your DNS records (changing email provider or web hosting service), you have to change the time-to-live to small number (i.e. <code>60</code> seconds) at least 24 hours before you start making the change.
</p>
<p>
  When you&#39;re happy with your DNS-records and you&#39;re done changing them, it&#39;s good practice to set TTL to a higher number. For most cases, 24 hours is big enough number, <code>86400</code> in seconds.
</p>

<h2 id="getting-a-website-online">Getting a website online</h2>
<p>
  Ok, got the domain. It&#39;s a great domain! What next?
</p>
<p>
  What you are looking for is a <strong>website hosting</strong> service. And like domain registrants, there are thousands and thousands website hosting services. There are global companies and there are local companies. They all offer the same service, connect a domain name with a website by editing <code>A</code>- or <code>CNAME</code>-records on the registrars website. They are part of your domain&#39;s DNS records and you have to edit the DNS records, otherwise your website does not work.
</p>
<p>
  The web hosting service will provide you instructions for updating your DNS-records.
</p>
<p>
  There are tools that you can use to check the DNS records. I use <a href="https://www.whatsmydns.net/">WhatsMyDNS</a> to check that my <code>A</code>, <code>MX</code>, or <code>CNAME</code> records are set correctly for my domains.
</p>
<p>
  Start small. Get bigger if you have the traffic. If you have 100 visitors per week, you don&#39;t need the beefiest service. Hundred visitors per week is such a low number that any kind of web hosting service can handle that easily.
</p>
<p>
  There are services that combine a web design tool and a hosting service. They have their limits but it will get you started.
</p>
<p>
  Website design &amp; hosting services:
</p>
<ul>
  <li>
    <a href="https://carrd.co/">Carrd</a>
  </li>
  <li>
    <a href="https://mmm.page/">Mmm.page</a>
  </li>
</ul>
<p>
  When you have a HTML+CSS files ready to go, then you are looking for a <strong>static website hosting</strong>:
</p>
<ul>
  <li>
    <a href="https://pages.github.com/">GitHub Pages</a> - Host a static site for free (your website source code is available for everyone),  your website is out there anyway, so it&#39;s not a big problem.
  </li>
  <li>
    <a href="https://surge.sh/">Surge</a> - Another static site hosting
  </li>
  <li>
    <a href="https://netlify.com">Netlify</a> - Netlify is a static website hosting company that offers their own services to build dynamic components.
  </li>
</ul>
<p>
  Buy your domain and website hosting from two different companies. Keep them separate and you have more flexibility.
</p>
<p>
  If possible, make sure that your website has a function or a meaning. It might be a newsletter sign-up form, or buying a SaaS subscription. It can be anything.
</p>
<p>
  Most cases it&#39;s selling or marketing, that&#39;s how you grow your business.
</p>
<p>
  If your website has a function, it usually means that the website has a call to action (CTA) that you hope your website visitors perform.
</p>
<p>
  Notice how I did not mention <a href="https://www.wordpress.com/">WordPress</a>, <a href="https://www.squarespace.com">SquareSpace</a> or <a href="https://www.webflow.com">Webflow</a>. They are very good tools in some cases, but not when you&#39;re building the first version of the website. Speed is the key, launch fast.
</p>

<h2 id="sending-and-receiving-emails-on-an-internet-domain">Sending and receiving emails on an internet domain</h2>
<p>
  Next step is to send and receive emails on your internet domain. Your domain has <code>MX</code>-records, (mail exchanger records) that will the tell email service where to deliver the emails. When you buy a domain, you can edit the DNS records (MX-record too!) of your domain via the registrars service.
</p>
<ul>
  <li>
    <a href="https://www.fastmail.com/">FastMail</a> - FastMail allows you to have one mailbox and multiple email domains and aliases.
  </li>
  <li>
    <a href="https://www.protonmail.com/">ProtonMail</a> - Allows one mailbox and one custom email domain
  </li>
  <li>
    <a href="https://www.purelymail.com/">PurelyMail</a> - Really cheap, they offer only email
  </li>
  <li>
    <a href="https://mailbox.org/en/">MailBox.org</a> - German, Secure, multiple aliases
  </li>
</ul>
<p>
  Remember, your email is the number one threat vector for cyber criminals. <strong>Use long passwords, and use two-factor authentication for extra security.</strong>
</p>
<p>
  Also, do not write your email address as plain text on a webpage. The email spammers have automatic email address scrapers that will grab your plain text email from your website into the spammer&#39;s email list. It&#39;s a sure way to be on the receiving end of a spam email. Use a contact form or write your email address on a image and put that on the website if you want to share your email address.
</p>

<h2 id="final-words">Final words</h2>
<p>
  I hope this article answers your questions on internet domains and websites. Just do it! Get a domain, build a website, acquire visitors! 💪
</p>
<p>
  To help you get started, you can follow the checklist below.
</p>

<br>
<br>
<h3>Checklist for a website with own custom domain:</h3>
<br>
<div class="clear-all">
  <ul>
    <li class="list-item" data-status="checked">
      <input type="checkbox" class="status-checkbox" checked id="checkbox-100">
      <label for="checkbox-100">
        Read this article
      </label>
    </li>
    <li class="list-item">
      <input type="checkbox" class="status-checkbox" id="checkbox-200">
      <label for="checkbox-200">
        Buy a domain name from domain registrant
      </label>
    </li>
    <li class="list-item">
      <input type="checkbox" class="status-checkbox" id="checkbox-300">
      <label for="checkbox-300">
        Set TTL to a low number
      </label>
    </li>
    <li class="list-item">
      <input type="checkbox" class="status-checkbox" id="checkbox-400">
      <label for="checkbox-400">
        Buy web hosting
      </label>
    </li>
    <li class="list-item">
      <input type="checkbox" class="status-checkbox" id="checkbox-500">
      <label for="checkbox-500">
        Update DNS-records on your domain registrant
      </label>

    </li>
    <li class="list-item">
      <input type="checkbox" class="status-checkbox" id="checkbox-600">
      <label for="checkbox-600">
        Check DNS-record probagation using WhatsMyDNS.net
      </label>
    </li>
    <li class="list-item">
      <input type="checkbox" class="status-checkbox" id="checkbox-700">
      <label for="checkbox-700">
        Do a test run of your website with a desktop and mobile browser
      </label>
    </li>
    <li class="list-item">
      <input type="checkbox" class="status-checkbox" id="checkbox-800">
      <label for="checkbox-800">
        Start building your website by building a useful website
      </label>
    </li>
    <li class="list-item">
      <input type="checkbox" class="status-checkbox" id="checkbox-900">
      <label for="checkbox-900">
        Start acquiring visitors
      </label>
    </li>

  </ul>

</div>

<br>
<br>
<p>
    Like that check list? Go check out <a href="https://masterlist.fi">MasterList</a>, my <del>task management tool</del> to-do app.
  </p>
<style>
  .clear-all {
    padding: 0;
    margin: 0;
  }
  .clear-all li {
    padding: 0;
    margin: 0;
  }
  .clear-all ul {
    padding: 0;
    margin: 0;
  }

  .list-item {
    display: flex;
    align-items: center;
    line-height: 2;
  }

  .list-item label {
    user-select: none;
    margin-top: 0.5rem;
    line-height: 1.2;
    font-size: 20px;
    margin-left: 0.25rem;
    padding-left: 0.25rem;
    margin-bottom: 0.5rem;
    position: relative;
    white-space: nowrap;
    overflow: hidden;
    text-overflow: ellipsis;
  }
  .list-item label::after {
    content: "";
    position: absolute;
    width: 0%;
    height: 3px;
    left: 0;
    top: calc(50% - 5px/2);
    background-color: #7cb85c;
    transition: 0.2s ease-in-out;
    pointer-events: none;
  }

  .flex-break {
    flex-basis: 100%;
    height: 0;
  }
  .list-item .description {
    width: 100%;
    color: #999;
    font-size: 14px;
    margin-top: 0.2rem;
    padding-right: 1rem;
    white-space: nowrap;
    overflow: hidden;
    text-overflow: ellipsis;
  }

  .list-item[data-status="checked"] > label::after {
    width: 100%;
  }

  input[type="checkbox"].status-checkbox {
    align-self: start;
    flex-shrink: 0;
    margin-top: 0.6rem;
    cursor: pointer;
    appearance: none;
    border: 1.5px solid #aaa;
    width: 20px;
    height: 20px;
    border-radius: 0.3rem;
    transition: background-color 0.25s;
    background-size: 20px 20px;
    background-color: #ffffff;
    background-image: url('data:image/svg+xml,<svg xmlns="http://www.w3.org/2000/svg" fill="none" viewBox="0 0 24 24" stroke-width="1" stroke="currentColor"><path stroke-linecap="round" stroke-width="2.5" stroke-linejoin="round" d="m7 13 4 3.5 6-9" stroke="%23ffffff"/></svg>');
  }

  input[type="checkbox"].status-checkbox:hover {
    background-repeat: no-repeat;
    background-size: 22px 22px;
    background-position: center;
    color: #c4cfe5;
    background-image: url('data:image/svg+xml,<svg xmlns="http://www.w3.org/2000/svg" fill="none" viewBox="0 0 24 24" stroke-width="1" stroke="currentColor"><path stroke-linecap="round" stroke-width="2.5" stroke-linejoin="round" d="m7 13 4 3.5 6-9" stroke="%23d8d8d8"/></svg>');
  }

  input[type="checkbox"].status-checkbox:checked {
    border: 1.5px solid #555;
    background-repeat: no-repeat;
    background-size: 22px 22px;
    background-position: center;
    background-color: #7cb85c;
    background-image: url('data:image/svg+xml,<svg xmlns="http://www.w3.org/2000/svg" fill="none" viewBox="0 0 24 24" stroke-width="1.5" stroke="currentColor"><path stroke-linecap="round" stroke-width="2.5" stroke-linejoin="round" d="m7 13 4 3.5 6-9" stroke="%23fff"/></svg>');
  }
</style>

<script>

  document.querySelectorAll('.status-checkbox').forEach( (el) => {
    el.addEventListener('change', (el) => {
      const parent = el.target.parentNode;
      parent.dataset.status = el.target.checked ? "checked" : "";
    });
  });
</script>]]></content><author><name></name></author><summary type="html"><![CDATA[Do you want to run your own website with your own domain name? This article answers your questions.]]></summary></entry><entry><title type="html">Updated setup PostgreSQL for your local Ruby on Rails development environment</title><link href="https://www.jomppanen.com/2023/08/19/updated-setup-for-postgresql-for-ruby-on-rails.html" rel="alternate" type="text/html" title="Updated setup PostgreSQL for your local Ruby on Rails development environment" /><published>2023-08-19T00:00:00+00:00</published><updated>2023-08-19T00:00:00+00:00</updated><id>https://www.jomppanen.com/2023/08/19/updated-setup-for-postgresql-for-ruby-on-rails</id><content type="html" xml:base="https://www.jomppanen.com/2023/08/19/updated-setup-for-postgresql-for-ruby-on-rails.html"><![CDATA[<p>This short guide will install PostgreSQL database on your local Ruby on Rails development environment.</p>

<p>The database will be placed in <code class="language-plaintext highlighter-rouge">vendor/postgres*</code> folder depending on your PostgreSQL version.</p>

<h2 id="create-the-database">Create the database</h2>

<p>Find out your local PostgreSQL version</p>

<div class="language-plaintext highlighter-rouge"><div class="highlight"><pre class="highlight"><code>$ postgres --version
postgres (PostgreSQL) 14.8
</code></pre></div></div>

<p>Create local database for Postgres</p>

<div class="language-plaintext highlighter-rouge"><div class="highlight"><pre class="highlight"><code>$ pg_ctl init -D vendor/postgresql&lt;version&gt;
</code></pre></div></div>

<h2 id="create-the-database-inside-your-ruby-on-rails-project">Create the database inside your Ruby on Rails project</h2>

<p>Start PostgreSQL on your terminal. After you have it running, open another terminal window and perform the other steps.</p>

<div class="language-plaintext highlighter-rouge"><div class="highlight"><pre class="highlight"><code>$ postgres -D vendor/postgresql14.2/
2023-08-19 18:09:38.097 EEST [22144] LOG:  starting PostgreSQL 14.8 (Homebrew) on aarch64-apple-darwin22.4.0, compiled by Apple clang version 14.0.3 (clang-1403.0.22.14.1), 64-bit
2023-08-19 18:09:38.099 EEST [22144] LOG:  listening on IPv6 address "::1", port 5432
2023-08-19 18:09:38.099 EEST [22144] LOG:  listening on IPv4 address "127.0.0.1", port 5432
2023-08-19 18:09:38.099 EEST [22144] LOG:  listening on Unix socket "/tmp/.s.PGSQL.5432"
2023-08-19 18:09:38.101 EEST [22145] LOG:  database system was shut down at 2023-08-19 18:09:35 EEST
2023-08-19 18:09:38.102 EEST [22144] LOG:  database system is ready to accept connections
...
...
</code></pre></div></div>

<h2 id="setup-database-users-for-your-project">Setup database users for your project</h2>

<p>Create a superuser for your database</p>

<div class="language-plaintext highlighter-rouge"><div class="highlight"><pre class="highlight"><code>$ createuser postgres -s
</code></pre></div></div>

<p>Create an user for your local development and use password <code class="language-plaintext highlighter-rouge">password</code>.</p>

<div class="language-plaintext highlighter-rouge"><div class="highlight"><pre class="highlight"><code>$ createuser localdev -d -P
</code></pre></div></div>

<h2 id="setup-database-configuration-on-ruby-on-rails">Setup database configuration on Ruby on Rails</h2>

<p>Depending on your PostgreSQL access control configuration, you might need to set username and password configuration to your <code class="language-plaintext highlighter-rouge">config/database.yml</code> file.</p>

<div class="language-plaintext highlighter-rouge"><div class="highlight"><pre class="highlight"><code># config/database.yml

...
...

development:
  ...

  # Add these two lines
  username: localdev
  password: password
  ...

test:
  ...

  # Add these two lines
  username: localdev
  password: password
  ...

</code></pre></div></div>

<h2 id="create-databases-for-development-and-test-environments">Create databases for development and test environments</h2>

<p>Run Rails task to create the databases. If you see following output, databases for development and test environments were created successfully.</p>

<div class="language-plaintext highlighter-rouge"><div class="highlight"><pre class="highlight"><code>$ rails db:create
Created database '&lt;rails_project_name&gt;_development'
Created database '&lt;rails_project_name&gt;_test'
</code></pre></div></div>

<h2 id="add-postgresql-to-your-procfiledev">Add PostgreSQL to your Procfile.dev</h2>

<p>Add the following line to <code class="language-plaintext highlighter-rouge">Procfile.dev</code></p>

<div class="language-plaintext highlighter-rouge"><div class="highlight"><pre class="highlight"><code># Procfile.dev

db: postgres -D vendor/postgresql&lt;version&gt;
</code></pre></div></div>

<h2 id="configure-git-to-ignore-the-development-databases">Configure Git to ignore the development databases</h2>

<p>Add this following line to <code class="language-plaintext highlighter-rouge">.gitignore</code> and commit it to your repository. This way your database will not be commited to the git repository.</p>

<div class="language-plaintext highlighter-rouge"><div class="highlight"><pre class="highlight"><code># .gitignore

/vendor/postgres*
</code></pre></div></div>

<h2 id="the-last-step">The Last Step</h2>

<p>Finally, start your Rails development engine and you’re good to go!</p>

<div class="language-plaintext highlighter-rouge"><div class="highlight"><pre class="highlight"><code>$ bin/dev
</code></pre></div></div>]]></content><author><name></name></author><category term="postgresql," /><category term="postgres," /><category term="ruby" /><category term="on" /><category term="rails" /><summary type="html"><![CDATA[This short guide will install PostgreSQL database on your local Ruby on Rails development environment.]]></summary></entry><entry><title type="html">Setup PostgreSQL for your local Ruby on Rails development environment</title><link href="https://www.jomppanen.com/2022/06/11/setup-postgresql-for-ruby-on-rails.html" rel="alternate" type="text/html" title="Setup PostgreSQL for your local Ruby on Rails development environment" /><published>2022-06-11T00:00:00+00:00</published><updated>2022-06-11T00:00:00+00:00</updated><id>https://www.jomppanen.com/2022/06/11/setup-postgresql-for-ruby-on-rails</id><content type="html" xml:base="https://www.jomppanen.com/2022/06/11/setup-postgresql-for-ruby-on-rails.html"><![CDATA[<div style="background-color: #aaea75; padding: 1rem; border-radius: 0.2rem;margin-bottom: 2rem;">👋 This blog post is outdated, please navigate to <a href="/2023/08/19/updated-setup-for-postgresql-for-ruby-on-rails">the newer version</a>.
</div>

<p>This short guide will install PostgreSQL database on your local Ruby on Rails development environment.</p>

<p>The database will be placed in <code class="language-plaintext highlighter-rouge">vendor/postgres*</code> folder depending on your PostgreSQL version.</p>

<h2 id="create-the-database">Create the database</h2>

<p>Find out your local PostgreSQL version</p>

<div class="language-plaintext highlighter-rouge"><div class="highlight"><pre class="highlight"><code>$ postgres --version
postgres (PostgreSQL) 14.2
</code></pre></div></div>

<p>Create local database for Postgres</p>

<div class="language-plaintext highlighter-rouge"><div class="highlight"><pre class="highlight"><code>$ pg_ctl init -D vendor/postgresql&lt;version&gt;
</code></pre></div></div>

<h2 id="setup-database-superuser">Setup database superuser</h2>

<p>Start PostgreSQL on another terminal. You have to have PostgreSQL running in order to perform the following steps.</p>

<div class="language-plaintext highlighter-rouge"><div class="highlight"><pre class="highlight"><code>$ postgres -D vendor/postgresql14.2/
2022-06-11 09:10:20.723 EEST [43595] LOG:  starting PostgreSQL 14.2 on aarch64-apple-darwin21.3.0, compiled by Apple clang version 13.0.0 (clang-1300.0.29.30), 64-bit
2022-06-11 09:10:20.725 EEST [43595] LOG:  listening on IPv6 address "::1", port 5432
2022-06-11 09:10:20.725 EEST [43595] LOG:  listening on IPv4 address "127.0.0.1", port 5432
...
...
</code></pre></div></div>

<p>Log in to PostgreSQL</p>

<div class="language-plaintext highlighter-rouge"><div class="highlight"><pre class="highlight"><code>$ psql -p 5432 -h localhost -d postgres
</code></pre></div></div>

<p>Create Superuser in Postgres</p>

<div class="language-plaintext highlighter-rouge"><div class="highlight"><pre class="highlight"><code>$ CREATE USER postgres SUPERUSER;
$ \quit
</code></pre></div></div>

<h2 id="setup-databaser-user-for-your-project">Setup databaser user for your project</h2>

<p>Create portal user for local development and use password <code class="language-plaintext highlighter-rouge">password12</code>.</p>

<div class="language-plaintext highlighter-rouge"><div class="highlight"><pre class="highlight"><code>$ createuser localdev -d -P -s
</code></pre></div></div>

<h2 id="setup-database-configuration-on-ruby-on-rails">Setup database configuration on Ruby on Rails</h2>

<p>Depending on your PostgreSQL access control configuration, you might need to username and password configuration to your <code class="language-plaintext highlighter-rouge">config/database.yml</code> file.</p>

<div class="language-plaintext highlighter-rouge"><div class="highlight"><pre class="highlight"><code># config/database.yml

...
...

development:
  ...

  # Add these two lines
  username: localdev
  password: password12
  ...

test:
  ...

  # Add these two lines
  username: localdev
  password: password12
  ...

</code></pre></div></div>

<h2 id="create-databases-for-development-and-test-environments">Create databases for development and test environments</h2>

<p>Run Rails task to create the databases. If you see following output, databases for development and test environments were created successfully.</p>

<div class="language-plaintext highlighter-rouge"><div class="highlight"><pre class="highlight"><code>$ rails db:create
Created database '&lt;rails_project_name&gt;_development'
Created database '&lt;rails_project_name&gt;_test'
</code></pre></div></div>

<h2 id="add-postgresql-to-your-procfiledev">Add PostgreSQL to your Procfile.dev</h2>

<p>Add the following line to <code class="language-plaintext highlighter-rouge">Procfile.dev</code></p>

<div class="language-plaintext highlighter-rouge"><div class="highlight"><pre class="highlight"><code># Procfile.dev

db: postgres -D vendor/postgresql&lt;version&gt;
</code></pre></div></div>

<h2 id="configure-git-to-ignore-the-development-databases">Configure Git to ignore the development databases</h2>

<p>Add this following line to <code class="language-plaintext highlighter-rouge">.gitignore</code> and commit it to your repository. This way your database will not be commited to the git repository.</p>

<div class="language-plaintext highlighter-rouge"><div class="highlight"><pre class="highlight"><code># .gitignore

/vendor/postgres*
</code></pre></div></div>

<h2 id="the-last-step">The Last Step</h2>

<p>Finally, start your Rails development engine and you’re good to go!</p>

<div class="language-plaintext highlighter-rouge"><div class="highlight"><pre class="highlight"><code>$ bin/dev
</code></pre></div></div>]]></content><author><name></name></author><category term="postgresql," /><category term="postgres," /><category term="ruby" /><category term="on" /><category term="rails" /><summary type="html"><![CDATA[👋 This blog post is outdated, please navigate to the newer version.]]></summary></entry><entry><title type="html">SEO for your Ruby on Rails application</title><link href="https://www.jomppanen.com/2021/01/22/seo-for-your-ruby-on-rails-application.html" rel="alternate" type="text/html" title="SEO for your Ruby on Rails application" /><published>2021-01-22T00:00:00+00:00</published><updated>2021-01-22T00:00:00+00:00</updated><id>https://www.jomppanen.com/2021/01/22/seo-for-your-ruby-on-rails-application</id><content type="html" xml:base="https://www.jomppanen.com/2021/01/22/seo-for-your-ruby-on-rails-application.html"><![CDATA[<p>I’m building a side project (a micro SaaS!) that you can use to send simple questions to your friends/colleagues and the recipients can answer through email. To get some traffic, this blog post describes how I optimized my Micro-SaaS for search engines. A basic set of techniques that form a baseline search engine optimization for a site. It does not get you a massive amount of traffic, but without these optimization techniques, you get zero traffic from search engines.</p>

<p><strong>Terminology:</strong></p>

<ul>
  <li>SEO means search engine optimization</li>
  <li>A web crawler is an automatic tool that crawls through the internet and analyses the content of every page that it can find, and stores that into a database, also known as indexing (i.e. Googlebot, Bingbot)</li>
  <li>A search engine is a web page/product that searches that indexed database using the keywords from the user (Google, Bing, Duckduckgo)</li>
</ul>

<h2 id="seo-analysis-tool">SEO Analysis Tool</h2>

<p>First, you need an SEO analysis tool. The internet is filled with online and offline tools that analyze your website from every possible aspect. Search engines are your friends, just search for “SEO Tool” and you will a lot of tools.</p>

<p>I’m using a browser extension called Detailed SEO Extension for simple SEO analysis. I don’t need a huge set of features, I just need the basic things and this extension does exactly that. You click a button and it gives you the current situation in an easily digestible version. Just head over to
<a href="https://detailed.com/extension/" target="_blank">Detailed SEO Extension</a> for the browser extension.</p>

<p>This is how it looks like when I analyze my Micro-SaaS landing page.</p>

<p><img src="/images/detailed_seo_extension.png" alt="" /></p>

<h2 id="html-meta-tags-for-seo-and-social">HTML Meta tags for SEO and Social</h2>

<p>When the link to your page is shared in Facebook or Telegram, it shows the link preview/thumbnail. That information comes from OpenGraph tags or Twitter card tags. Luckily Twitter understands OpenGraph, so I’m not using Twitter cards.</p>

<p>The minimal opengraph / twitter card tags looks like this:</p>

<div class="language-plaintext highlighter-rouge"><div class="highlight"><pre class="highlight"><code>&lt;meta property="og:title" content="Yesno.email - Ask simple questions via email from your friends and colleagues"&gt;
&lt;meta property="og:description" content="Send simple yes/no questions with Yesno.email -- No more back and forth emails, send one email and get your question answered. When everybody has answered the question or the question expires, you will get a report with results and individual answers."&gt;
&lt;meta property="og:image" content=""&gt;
&lt;meta property="og:url" content="https://www.yesno.email"&gt;
&lt;meta name="twitter:card" content="summary_large_image"&gt;
</code></pre></div></div>

<h2 id="description-tag">Description tag</h2>

<p>When your site appears on the search engine results page, the description tag in the HTML head is what is shown to the user. This piece of text is very important since it plays a major significance if a user clicks the link and lands on your website. The description cannot be too short or too long, many SEO tools say 70-120 characters is the optimal length.</p>

<p>This is a very important line of HTML, give it some thought.</p>

<div class="language-plaintext highlighter-rouge"><div class="highlight"><pre class="highlight"><code>&lt;meta name="description" content="Ask simple questions via email from your friends and colleagues and get them answered! Yesno.email"&gt;
</code></pre></div></div>

<h2 id="canonical-link">Canonical link</h2>

<p>The canonical link tells the search engine the location of the original version. In this case, there are no other copies of the site or the content, the site-wide canonical link structure is very simple. Just set the canonical link to point to the same page.</p>

<p>Just put this line in your <code class="language-plaintext highlighter-rouge">application.html.erb</code> and your canonical links are in order.</p>

<div class="language-plaintext highlighter-rouge"><div class="highlight"><pre class="highlight"><code>&lt;link rel="canonical" href="&lt;%= url_for(only_path: false, protocol: :https) %&gt;" /&gt;
</code></pre></div></div>

<h2 id="header-tags">Header-tags</h2>

<p>Just use one &lt;h1&gt; tag per page. It’s the main header of your page and search engines use headers when they are indexing the page.</p>

<p>After you are happy with &lt;h1&gt;, next step is to put kick ass &lt;h2&gt; in place.</p>

<h2 id="robotstxt">Robots.txt</h2>

<p>Robots.txt is a file that provides information about your site to web crawlers. If you don’t want to index a certain part of your site, specify it in the file.</p>

<p>In yesno.email, there are a few routes that web crawlers have no business crawling. It has a path http://yesno.email/answers/* that is the route for an active question. When a user opens that route, the answer is registered for a question and the path goes inactive. This is the core functionality of yesno.email. If crawlers start hitting the route, it may potentially mess up an active question.</p>

<p>The disabled route in robots.txt is not enough protection. Yesno.email uses a gem called <a href="https://github.com/fnando/browser">browser</a> to detect crawlers in controllers. This is the only way to block email clients who are prefetching links on an email.</p>

<p>My robots.txt also contains the full path to the sitemap file.</p>

<div class="language-plaintext highlighter-rouge"><div class="highlight"><pre class="highlight"><code># robots.txt

User-agent: * Disallow: /answers/*
User-agent: * Disallow: /confirmations/*

Sitemap: https://www.yesno.email/sitemap.xml.gz
</code></pre></div></div>

<h2 id="sitemap">Sitemap</h2>

<p>Sitemaps are XML documents that describe the structure of your site for web crawlers. The larger your site is, the bigger benefit you will get from well-defined sitemap file. Sitemap file has useful information to web crawlers, i.e. the update frequency of a page. You can tell web crawlers to crawl a page every day or even every hour. Very useful if you have a page that changes multiple times per day.</p>

<p>You need line this in your <code class="language-plaintext highlighter-rouge">app/views/layouts/application.html.erb</code></p>

<div class="language-plaintext highlighter-rouge"><div class="highlight"><pre class="highlight"><code>&lt;link rel="sitemap" type="application/xml" title="Sitemap" href="/sitemap.xml.gz" /&gt;
</code></pre></div></div>

<p>A gem called <a href="https://github.com/kjvarga/sitemap_generator">sitemap_generator</a> makes things easier. It creates a sitemap file in <code class="language-plaintext highlighter-rouge">public/sitemap.xml.gz</code> that is built according the rules in <code class="language-plaintext highlighter-rouge">config/sitemap.rb</code>.</p>

<p>After you have installed the gem, you can refresh your sitemap and automatically ping the web crawlers to crawl your site.</p>

<div class="language-plaintext highlighter-rouge"><div class="highlight"><pre class="highlight"><code>$ rails sitemap:refresh

In '/Users/tuomas/Projects/src/yesno/public/':
+ sitemap.xml.gz                                           2 links /  342 Bytes
Sitemap stats: 2 links / 1 sitemaps / 0m00s

Pinging with URL 'https://www.yesno.email/sitemap.xml.gz':
  Successful ping of Google
  Successful ping of Bing
</code></pre></div></div>

<h2 id="summary">Summary</h2>

<p>Search engines and web crawlers improve constantly. In 2021, there are no dirty tricks or easy victories in SEO. The best way to get traffic from search engines is to write content that provides value to visitors. The foundation of the worldwide web still is the same, it’s the hyperlinks. It is the clearest signal for web crawlers and search engines. When a site links to another site, it is a vote of confidence and authority. The more links you have to your page, the better changes it has to end up on the search results page on certain keywords.</p>

<p>The SEO work I did for <a href="https://yesno.email">yesno.email</a> takes a while to affect. The site is very small, and there is no extra content that the crawlers could index. Without any additional content, I don’t expect huge traffic through search engines.</p>

<p>Search engine optimization is important, but it’s still a tool in your toolbox. The better you know your target audience, the better results you get from SEO. What is the problem of your target audience? Do they use search engines when they are learning how to solve that problem? If they use search engines, what kind of keywords they use? If you know the answers to these questions, everything becomes a bit easier, even SEO. 😉</p>]]></content><author><name></name></author><category term="seo," /><category term="marketing" /><summary type="html"><![CDATA[I’m building a side project (a micro SaaS!) that you can use to send simple questions to your friends/colleagues and the recipients can answer through email. To get some traffic, this blog post describes how I optimized my Micro-SaaS for search engines. A basic set of techniques that form a baseline search engine optimization for a site. It does not get you a massive amount of traffic, but without these optimization techniques, you get zero traffic from search engines.]]></summary></entry><entry><title type="html">My computer setup in 2021</title><link href="https://www.jomppanen.com/2021/01/17/my-computer-setup-in-2021.html" rel="alternate" type="text/html" title="My computer setup in 2021" /><published>2021-01-17T00:00:00+00:00</published><updated>2021-01-17T00:00:00+00:00</updated><id>https://www.jomppanen.com/2021/01/17/my-computer-setup-in-2021</id><content type="html" xml:base="https://www.jomppanen.com/2021/01/17/my-computer-setup-in-2021.html"><![CDATA[<p>After using my trusty workhorse Apple Macbook 13” that I bought in 2013, I bought a brand new Apple Macbook Air 13” in December 2020. Setting up a new computer customized for your particular needs is a bigger job than I thought.</p>

<p>To save time the next time, I decided to document my setup for future reference.</p>

<h2 id="how-i-write-code">How I write code</h2>

<h3 id="vim">Vim</h3>

<p>I started with empty <code class="language-plaintext highlighter-rouge">vimrc</code> and slowly adding stuff I need. I’m using just a couple of plugins (Nerdtree, ctrlp, supertabl, vim-endwise). Very minimal Vim setup.</p>

<p>Too bad I’m also using Sublime Text, so I probably don’t reach the higher levels of Vim mastery.</p>

<p><a href="https://www.vim.org/" target="_blank">Vim</a>
<br />
<br /></p>

<h3 id="sublime-text">Sublime Text</h3>

<p>The reason why I use Sublime Text instead of VSCode is the speed. Sublime Text launches almost as fast as Vim. For a color scheme, I’m using Monokai.</p>

<p><a href="https://www.sublimetext.com/" target="_blank">Sublime Text</a>
<br />
<br /></p>

<h3 id="dash">Dash</h3>

<p>Dash is my choice for documentation browser. The thing about Dash and other documentation browsers is the ability to store documentation offline, making it lightning fast to search for something.</p>

<p>I’ve configured Dash to open with <code class="language-plaintext highlighter-rouge">Command-§</code>, it’s the button just below Escape-key.</p>

<p><a href="https://kapeli.com/dash" target="_blank">Dash</a>
<br />
<br /></p>

<h3 id="fonts">Fonts</h3>

<p>I spend my days staring at text on my screen, so I want to optimize the font face for reading and writing code. Inconsolata and M+ are both monospaced fonts designed with great attention to detail and they are specially designed for reading and writing code. Both fonts match exactly what I need.</p>

<p><a href="https://www.levien.com/type/myfonts/inconsolata.html" target="_blank">Inconsolata</a></p>

<p><a href="http://mplus-fonts.osdn.jp/index.html" target="_blank">M+ font family</a>
<br />
<br /></p>

<h2 id="how-i-listen-to-music">How I listen to music</h2>

<h3 id="difm">DI.FM</h3>

<p>I stumbled upon DI.FM in ~2000 and kept listening to it occasionally during the 2000s. Back then DI.FM was called Digitally Imported. Turns out they are one of the first internet radios. They’ve been online since 1999!</p>

<p>A few of weeks ago, I found DI.FM again! I like the idea that a living person curates music instead of an algorithm so now I’m a happy paying customer.</p>

<p><a href="https://www.di.fm">DM.FM (Digitally Imported)</a>
<br />
<br /></p>

<h3 id="spotify">Spotify</h3>

<p>I’m constantly contemplating discontinue my Spotify subscription. It plays music and that’s about it. That is the job I hire Spotify for. Spotify does not see it that way, as it wants to push features that I don’t need. As soon as a better alternative hits my radar, the threshold for a switch is very minimal and Spotify goes bye-bye.</p>

<p>I’m already a paying customer. Using paying customers to growth hack more users feel like a dark pattern.</p>

<h2 id="how-i-take-notes">How I take notes</h2>

<h3 id="apple-notes">Apple Notes</h3>

<p>This is a disappointment. The internet is filled with great note-taking apps but I’ve settled to Apple Notes. I don’t even know what’s the official name for it, is it Notes.app or Apple Notes or maybe iNotes? Yet, Apple Notes fills 90% of my use cases. Maybe the note-taking apps are so commoditized, there are so few differences between them that I don’t need to look elsewhere?</p>

<p>I’ve used several note-taking apps, I did use Bear several years until I just found myself using Notes more than Bear. Bear is a great piece of software, I just gravitated more towards Apple Notes.</p>

<p><a href="https://bear.app/" target="_blank">Bear</a>
<br />
<br /></p>

<h3 id="numi">Numi</h3>

<p>Numi is an interesting combination of a calculator and a notepad. It’s a calculator but on steroids. It’s becoming an integral part of my workflows since I can use variables and write long “notes” that are actually calculations.</p>

<p>I’ve configured Numi to open with <code class="language-plaintext highlighter-rouge">Option-§</code>, it’s the button just below Escape-key in the Finnish keyboard layout.</p>

<p><a href="https://numi.app" target="_blank">Numi</a>
<br />
<br /></p>

<h2 id="other-apps">Other Apps</h2>

<h3 id="iterm">iTerm</h3>

<p>The Mac OS terminal is really close to iTerm feature-wise, but iTerm offers a bit more features and configuration. I’ve configured iTerm to open Sublime Text when I click a text that resembles a full path of a file name, like in Ruby on Rails error stack trace.</p>

<p><a href="https://iterm2.com/" target="_blank">iTerm</a>
<br />
<br /></p>

<h3 id="rectangleapp">Rectangle.app</h3>

<p>Rectangle allows me to move and resize windows with hotkeys. Very simple and useful app! I just have a couple of hotkeys defined, move the window to left-half or right-half of the screen.</p>

<p><a href="https://rectangleapp.com/" target="_blank">Rectangle</a>
<br />
<br /></p>

<h3 id="tweetbot">TweetBot</h3>

<p>TweetBot is the best! It shows me a timeline without suggested tweets or ads. It only shows content from accounts that I follow. It makes Twitter feel like it’s 2010 again.</p>

<p><a href="https://tapbots.com/tweetbot/" target="_blank">Tweetbot for iOS</a>
<a href="https://www.tapbots.com/tweetbot/mac/" target="_blank">Tweetbot for Mac OS</a>
<br />
<br /></p>

<h3 id="homebrew">Homebrew</h3>

<p>Does not need any introductions, it’s the package manager for Mac OS.</p>

<p><a href="https://brew.sh" target="_blank">Homebrew</a>
<br />
<br /></p>

<h3 id="oh-my-zsh">Oh My Zsh</h3>

<p>I just installed Oh My Zsh and without any configuration, I got a command-line prompt that shows Git status (branch!) and Git completion. No extra configuration was needed!</p>

<p><a href="https://ohmyz.sh/" target="_blank">Oh My Zsh</a>
<br />
<br /></p>

<h3 id="vlc-videolan-client">VLC (VideoLAN Client)</h3>

<p>I mostly use VLC to play DI.FM internet radio channels. I’d like to think that VLC (which is a native application) eats less battery than a browser playing DI.FM stream.</p>

<p>VideoLAN is a non-profit organization that develops VLC and related products. It was founded in 2009. The project originally started in 1996 as a student project and it’s been an open-source project since 1998.</p>

<p><a href="https://videolan.org">VLC</a>
<br />
<br /></p>

<h3 id="flux">F.lux</h3>

<p>F.lux keeps me to sleep better. It adjusts the color temperature of my screen to match with my local time. It tints my screen red during the evenings, so my brain thinks we’re getting closer to bedtime. Brilliant!</p>

<p>I’m not sure how effective it is, but I have no plans living without F.lux.</p>

<p><a href="https://justgetflux.com/" target="_blank">F.lux</a>
<br />
<br /></p>]]></content><author><name></name></author><category term="programming" /><summary type="html"><![CDATA[After using my trusty workhorse Apple Macbook 13” that I bought in 2013, I bought a brand new Apple Macbook Air 13” in December 2020. Setting up a new computer customized for your particular needs is a bigger job than I thought.]]></summary></entry><entry><title type="html">How I architect users and organisations in Ruby on Rails applications</title><link href="https://www.jomppanen.com/2020/02/04/how-i-architect-users-and-organizations-in-ruby-on-rails-applications.html" rel="alternate" type="text/html" title="How I architect users and organisations in Ruby on Rails applications" /><published>2020-02-04T00:00:00+00:00</published><updated>2020-02-04T00:00:00+00:00</updated><id>https://www.jomppanen.com/2020/02/04/how-i-architect-users-and-organizations-in-ruby-on-rails-applications</id><content type="html" xml:base="https://www.jomppanen.com/2020/02/04/how-i-architect-users-and-organizations-in-ruby-on-rails-applications.html"><![CDATA[<p>This is a blog post goes through some of the best practices that I have found out over the years when I have been building SaaS’ish web applications.</p>

<p>I use <a href="https://github.com/heartcombo/devise">Devise</a> as my authentication library. I consider it the de facto authentication solution, at least until Ruby on Rails introduces an authentication solution that is built into Ruby on Rails.</p>

<p>I have been thinking about this subject for months, but this tweet by <a href="https://www.twitter.com/r00k">Ben Orenstein</a> was the final push to get me into writing mode.</p>

<blockquote>
  <p>“Has anyone written something great about how to model your Rails-based SaaS app with Users, Teams, Organizations, and Subscriptions so that you don’t regret it later?”</p>
</blockquote>

<p><a href="https://twitter.com/r00k/status/1223450246992334850">A link to the original tweet</a></p>

<h2 id="users-and-organizations">Users and Organizations</h2>

<p>The <code class="language-plaintext highlighter-rouge">Organization</code> is a model that is at the core of everything. Every <code class="language-plaintext highlighter-rouge">User</code> will be a member of an organization through an association called <code class="language-plaintext highlighter-rouge">Membership</code>.</p>

<p><img src="/images/ruby-on-rails-application-er-diagram.png
#center" alt="ER Diagram" /></p>

<p>When a user is created by Devise, it creates an organization and  membership and associates all of these three together.</p>

<p>The day will come when you need to associate your users in organizations and it will be the refactor from your worst nightmares. You will be better off by just associating organizations and users from the beginnings of your project.</p>

<h2 id="base-controllers">Base Controllers</h2>

<p>I like to use two different controllers for guest users and logged in users, <code class="language-plaintext highlighter-rouge">ApplicationController</code> is used for users who are not signed in and <code class="language-plaintext highlighter-rouge">SignedInApplicationController</code> is used when I want to restrict the controller only for users who are currently signed in.</p>

<p>ApplicationController is as plain as possible.</p>

<div class="language-plaintext highlighter-rouge"><div class="highlight"><pre class="highlight"><code># app/controller/application_controller.rb

class ApplicationController &lt; ActionController::Base

  protected
    def after_sign_in_path_for(user)
      designs_path(user)
    end
end
</code></pre></div></div>

<p><code class="language-plaintext highlighter-rouge">SignedInApplicationController</code> has a larger set of responsibilities. It exposes two helper-methods, <code class="language-plaintext highlighter-rouge">current_user</code> is a Devise method and <code class="language-plaintext highlighter-rouge">current_organization</code> is defined here. It also forces to use a specific layout for signed-in users.</p>

<div class="language-plaintext highlighter-rouge"><div class="highlight"><pre class="highlight"><code># app/controller/signed_in_application_controller.rb

class SignedInApplicationController &lt; ActionController::Base
  before_action :authenticate_user!
  layout "signed_in_application"
  helper_method :current_organization
  helper_method :current_user

  protected

    def current_organization
      @current_organization ||= current_user.organization
    end
end
</code></pre></div></div>

<h2 id="namespacing-models-and-controllers">Namespacing models and controllers</h2>

<p>I like to put models and controllers into namespaces when if they share similar responsibilities. Authentication and accounts prime candidates for namespacing and putting the files into subfolders.</p>

<p>As I mentioned, I am using Devise as go-to my authentication library. It works perfectly and does everything I need. I just override the create-method in registration controller, because I want to create <code class="language-plaintext highlighter-rouge">Organization</code> and <code class="language-plaintext highlighter-rouge">Membership</code> at the same time when <code class="language-plaintext highlighter-rouge">User</code> is created.</p>

<p><strong>Directory structure</strong></p>

<div class="language-plaintext highlighter-rouge"><div class="highlight"><pre class="highlight"><code>controllers
  app/controllers/authentication/registrations_controller.rb

models
  app/models/accounts/user.rb
  app/models/accounts/organization.rb
  app/models/accounts/membership.rb
</code></pre></div></div>

<p>The connection between <code class="language-plaintext highlighter-rouge">User</code> and <code class="language-plaintext highlighter-rouge">Organization</code> uses a conditional scope that returns only active memberships. This is a safety mechanism  built into <code class="language-plaintext highlighter-rouge">has_many</code> association method <code class="language-plaintext highlighter-rouge">organizations</code> to allow access only if membership is active.</p>

<div class="language-plaintext highlighter-rouge"><div class="highlight"><pre class="highlight"><code># app/models/accounts/user.rb

class Accounts::User &lt; ApplicationRecord
  devise :database_authenticatable, :registerable, :recoverable,
         :rememberable, :validatable, :confirmable, :trackable

  has_many :memberships
  has_many :organizations, -&gt; {where(accounts_memberships: { status: 0})}, through: :memberships
  has_many :all_organizations, through: :memberships, source: :organization

  def organization
    # for now, just assume that user has membership with
    # only one organization
    organizations.first
  end
end
</code></pre></div></div>

<h2 id="creating-an-organization-when-user-record-is-created">Creating an organization when user-record is created</h2>

<p>There are a couple of ways to achieve this. I like to create the organization-model in the registrations controller.</p>

<p>The code here below is copied from my latest project. If you want to use this, please do not copy it from here. Instead, go to <a href="https://github.com/heartcombo/devise">Devise repository</a> , find the <code class="language-plaintext highlighter-rouge">registrations_controller.rb</code> file and copy it from there. The <code class="language-plaintext highlighter-rouge">create_user_organization_and_membership</code> method does not necessarily need to be in the controller. You can put it into a separate file and make it as a model or a service object, whatever feels right for you.</p>

<div class="language-plaintext highlighter-rouge"><div class="highlight"><pre class="highlight"><code># app/controllers/authentication/registrations_controller.rb

class Authentication::RegistrationsController &lt; Devise::RegistrationsController
  def create
    build_resource(sign_up_params)

    # here is where the user-model is created
    create_user_organization_and_membership(resource)

    yield resource if block_given?
    if resource.persisted?
      if resource.active_for_authentication?
        set_flash_message! :notice, :signed_up
        sign_up(resource_name, resource)
        respond_with resource, location: after_sign_up_path_for(resource)
      else
        set_flash_message! :notice, :"signed_up_but_#{resource.inactive_message}"
        expire_data_after_sign_in!
        respond_with resource, location: after_inactive_sign_up_path_for(resource)
      end
     else
       clean_up_passwords resource
       set_minimum_password_length
       respond_with resource
     end
   end

   protected
     def after_inactive_sign_up_path_for(user)
       pending_confirmation_path
     end

     def create_user_organization_and_membership(user)
       return false unless user.valid?
       ActiveRecord::Base.transaction do
         user.save
         organization = Accounts::Organization.create(status: "active", name: user.email, created_by: user.email)
         membership = Accounts::Membership.create(organization: organization, user: user, role: "owner")
       end
       user
     rescue ActiveRecord::RecordInvalid =&gt; e
       # would be good idea to log the error message
       user
     end
end
</code></pre></div></div>

<h2 id="what-about-payments-and-subscriptions">What about payments and subscriptions?</h2>

<p>When thinking about responsibilities in this architecture, the responsibility of holding the information if somebody has paid or not belongs to <code class="language-plaintext highlighter-rouge">Organization</code>.</p>

<p>The <code class="language-plaintext highlighter-rouge">Subscribeable</code> concern has the logic to determine if an organization has a payment subscription or not. It also has the functionality to start and end a subscription.</p>

<p>In my case, it contains free-trial functionality and requires a subscription after the free trial ends. Requiring the credit card in the registration process is a bit tricky in the EU with strong-customer-authentication (SCA) regulation.</p>

<p>I like to put payments into their own namespace. All related code lives in <code class="language-plaintext highlighter-rouge">payments</code> namespace. Payment processor related code lives in their own directories, for example <code class="language-plaintext highlighter-rouge">app/models/payments/processors/stripe_processor.rb</code></p>

<p><img src="/images/ruby-on-rails-application-er-diagram-with-payments.png#center" alt="ER Diagram" /></p>

<p><code class="language-plaintext highlighter-rouge">Organization</code>-class includes <code class="language-plaintext highlighter-rouge">Subscribeable</code> concern.</p>

<div class="language-plaintext highlighter-rouge"><div class="highlight"><pre class="highlight"><code># app/models/accounts/organization.rb

class Accounts::Organization &lt; ApplicationRecord
  include Payments::Subscribeable

  ...
end
</code></pre></div></div>

<h2 id="closing-words">Closing words</h2>

<p>When creating something larger than “Hello World”, things get complicated quickly. The term  “it depends” is used more and more. Any blog post written about software architecture can be read with a grain of salt. So pleas remember, this is just one way of architecting a SaaS user management.</p>

<p>If this approach feels a bit too limited for you, head over to FireHydrant blog and read <a href="https://www.firehydrant.io/blog/how-firehydrant-creates-data-in-rails/">this blog post</a> by Bobby Tables.</p>

<p><strong>I would greatly appreciate it if you kindly give me some feedback on blog post!</strong></p>

<p>If you have ideas on how to handle the generic-part of the architecture of a SaaS, please send me an email or tweet at me. I’m always looking   to improve my skills and knowledge!</p>

<p>Any kind of feedback is appreciated! My email is <img src="/images/tuomas-email.png#inline" alt="my first name at my first name dot io" /></p>]]></content><author><name></name></author><category term="programming" /><summary type="html"><![CDATA[This is a blog post goes through some of the best practices that I have found out over the years when I have been building SaaS’ish web applications.]]></summary></entry><entry><title type="html">My History with Programming Languages</title><link href="https://www.jomppanen.com/2016/12/31/my-history-with-programming-languages.html.html" rel="alternate" type="text/html" title="My History with Programming Languages" /><published>2016-12-31T00:00:00+00:00</published><updated>2016-12-31T00:00:00+00:00</updated><id>https://www.jomppanen.com/2016/12/31/my-history-with-programming-languages.html</id><content type="html" xml:base="https://www.jomppanen.com/2016/12/31/my-history-with-programming-languages.html.html"><![CDATA[<h2 id="my-earliest-memory-of-programming-language">My Earliest Memory of Programming Language</h2>

<p>My earliest memory related to programming goes way back into the 80’s. I was with my cousin, playing with He-Man figures. Obviously, we needed a portal. We tried to make it with pen and paper but there was nothing cool about it, it was a portal after all. Portals need to be cool.</p>

<p>I realised that if I would turn on my computer and change the background color, it would be a cool portal. Naturally, after few minutes, I wanted to change it constantly. That was probably the first time I wanted to read a book to actually learn something. It’s a good thing that Spectravideo 328 had pretty good Basic-manual. After reading through the manual I made a animation with for-loop and I had a portal beyond any coolness! I think I was about 10 year old back then.</p>

<h2 id="the-list-of-programming-languages">The List of Programming Languages</h2>

<p>Here is a list of programming languages I’ve had pleasure to work with. Since I learned programming it has been my hobby ever since, I don’t think there is a week that I haven’t written at least few lines of code.</p>

<h3 id="basic-programming-language">Basic Programming Language</h3>

<p>My first computers were Spectravideo 328, Spectravideo 728 and Commodore 64. I never got into anything more powerful, Basic programming language is what I was using. Newer tried Commodore 64 Assembler, even that was the thing the cool kids used.</p>

<p>Thank You Spectravideo for doing awesome job on the manuals. I thought myself programming from a books written in foreign language (English) in a method that pretty much looked like the method Zed Shaw used in his <a href="https://learnrubythehardway.org/">programming books</a>.</p>

<p>I also used Basic when I got Atari 512 and STOS. It was an development environment built for making games. You have no idea how cool it was back then. Of course next year they released AMOS for Amiga and it had no line numbers! How you can write programs without line numbers?</p>

<p>My options were Atari ST and Amiga 500. The sales person in Atari-shop was so convincing with some image editor. It was so convincing that I didn’t even want to see what Amiga 500 could do…</p>

<h3 id="turbo-pascal">Turbo Pascal</h3>

<p>I got my first PC and I got a copy of Turbo Pascal. Pascal did not use line numbers, it used functions and procedures! It had a lot of memory, I could load images into memory and use them as sprites. I was walking on a very steep path of game programming.
I could reference a specific point in memory, read and write bytes into it, but back then, I really did not find any use for it. I did my pixel drawing with Turbo Pascal standard library. There was no internet, there was only few BBS’s where I could download tutorials.</p>

<p>This was about the time I got familiar with Demoscene. The intros and demos for Amiga blew my mind several times, and I tried to replicate the easiest effects with Turbo Pascal. Even the easiest effects seems to be out of my reach.</p>

<h3 id="cc">C/C++</h3>

<p>After a while, I grew tired of restrictions of Turbo Pascal. I somehow got my hands on DJGPP and Watcom-products. C was a total beast, it could do pretty much anything! I could reboot my computer by using variables in a wrong way. I found out I did not need any libraries if I would like to draw pixels on screen, there was a certain point in memory where I could write data and it would show up on my screen instantly. Crazy!</p>

<p>I wrote my own Sprite-libraries, Polygon-drawing libraries, keyboard handling by using interruptions, all sorts of things are taken granted in 2010’s. One great thing about C was that I could use inline assembler to do really fast things. I could fill my screen with specific color with just few commands. (<code class="language-plaintext highlighter-rouge">rep stosb</code>)</p>

<p>I did intros, demos and really simple games that used 3D, but it was really hard to write 3D engine in C. That led to me to C++ and object oriented programming. A 3D engine was much easier to write by using objects that are linked to other objects, inheriting positions and rotations from parent objects. That was the way I learned object oriented programming, even thought I didn’t know the terminology at all back then.</p>

<h3 id="java">Java</h3>

<p>I was about 20 year old when I first me Java and JVM. First, it was really weird not having direct access to memory and let the JVM worry about deleting all unused variables. Eventually I got over it. I’ve never written any big programs with Java as a hobby, I’ve only written bigger Java projects at work. I wasn’t the biggest fan of Java back then.</p>

<p>I eventually ended up in a game company that did mobile games. The mobile phones back then were using b&amp;W screen and there was just few kilobytes of memory. My C/C++ skills came handy when I had to squeeze Java programs into small memory footprint, especially fixed-point maths.</p>

<h3 id="php">PHP</h3>

<p>During my Java-phase, I also got interested in writing web sites. I tried Microsoft ASP but PHP was much easier to understand. I did web sites with PHP and eventually I ended up writing my own MVC-framework. It never got into production-quality level, since PHP had bit of problems back then that prevented me to do the things I wanted.</p>

<h3 id="python">Python</h3>

<p>From PHP, I jumped on board with Python because it had pretty cool game programming libraries (LibSDL). I tried web programming with few frameworks but somehow I didn’t get along with Python. Every time I got frustrated with Python I jumped back to PHP. After a while I got frustrated with PHP so I came back to Python. This happened many times.</p>

<h3 id="ruby">Ruby</h3>

<p>One day I saw video that blew my mind like Future Crew’s Second Reality. I watched a guy writing a blog with this magical programming language, using really cool framework. I was instantly hooked. Even the editor the guy used to write the code was mind blowingly simple and powerful.</p>

<p>I met Ruby, Ruby on Rails and Textmate at the same time, introduced by DHH. Like many Rubyist, I met Ruby through Ruby on Rails. I remember many times confusing functionality of Ruby on Rails with Ruby, but so what? Writing code with Ruby and Ruby on Rails was so much fun!</p>

<p>I remember the restful changes introduced in Ruby on Rails 1.2 and the big merge with Merb and Ruby on Rails. The biggest factor of my warm feelings to Ruby and Ruby on Rails is the community. There has been so many cool &amp; weird people, that it would be unfair to list them all.</p>

<p>I’ve contributes to few Ruby open-source projects but my biggest contribution to Ruby community is <a href="https://rubysauna.github.io">Rubysauna</a>, which we have been organising with <a href="https://twitter.com/polarblau">@polarblau</a>.</p>

<h3 id="javascript">Javascript</h3>

<p>Everything that can be written in Javascript, eventually will be written in Javascript. I’ve written a ton of Javascript, I’ve built a <a href="http://www.gridlover.net">typography tool</a> with <a href="https://twitter.com/sakamies">Ville Vanninen</a> that has been rewritten number of times. I have a suspicion that next rewrite will be with React.</p>

<p>Even Javascript is a language that, in past 10 years, I’ve most likely written most lines of code, I still don’t consider myself a Javascript developer.</p>

<h3 id="elixir--go">Elixir &amp; Go</h3>

<p>Even though Ruby is my weapon of choice pretty much everything, I’ve got to know Go and Elixir a bit. I’ve spent enough time with both of them to understand why people like them.</p>

<p>With Go, I like how the libraries are compact but still really powerful.</p>

<p>Elixir has been huge in Ruby community. It’s built one of the Ruby legends. Elixir has taken the best part of Ruby and put Erlang VM underneath.</p>

<p>I don’t know what’s my next favourite programming language is, but in 2016, I consider myself as Ruby developer.</p>]]></content><author><name></name></author><category term="programming" /><summary type="html"><![CDATA[My Earliest Memory of Programming Language]]></summary></entry></feed>